
22 Blackout Tattoos That Rewrite the Rules of Ink (And Why They’re More Strategic Than You Think)
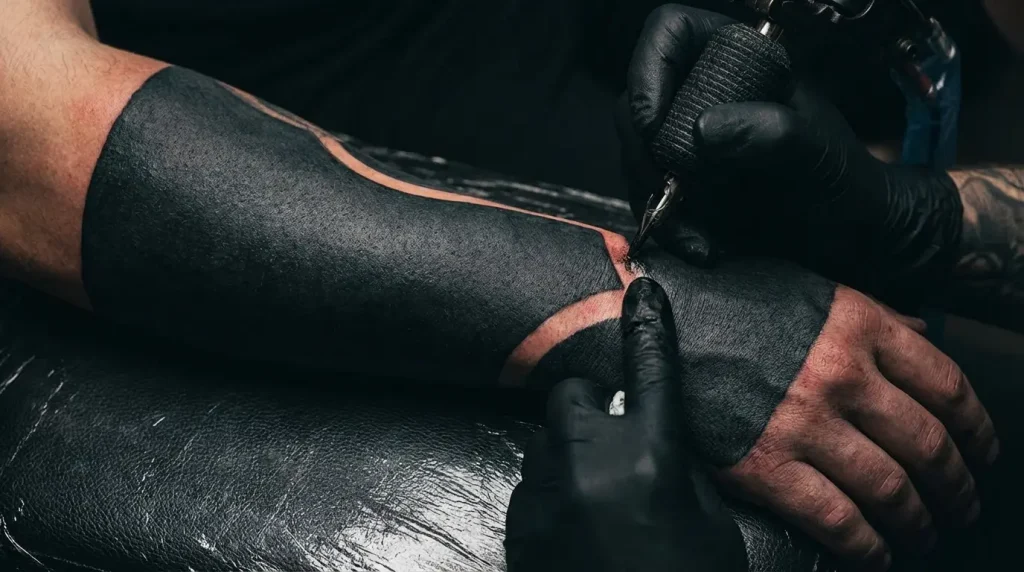
Table of Contents
-
What Makes Blackout Tattoos a Strategic Choice (Not Just a Cover-Up)
-
Bold Statements: Full Coverage Blackout Pieces
-
Full Sleeve Blackout
-
Blackout Arm Tattoo with Geometric Windows
-
Double Arm Blackout Symmetry
-
Blackout Shoulder to Chest Extension
-
-
Precision Erasure: Targeted Blackout Applications
-
Blackout Wrist Band
-
Forearm Blackout Panel
-
Elbow to Wrist Gradient Blackout
-
Shoulder Cap Blackout
-
-
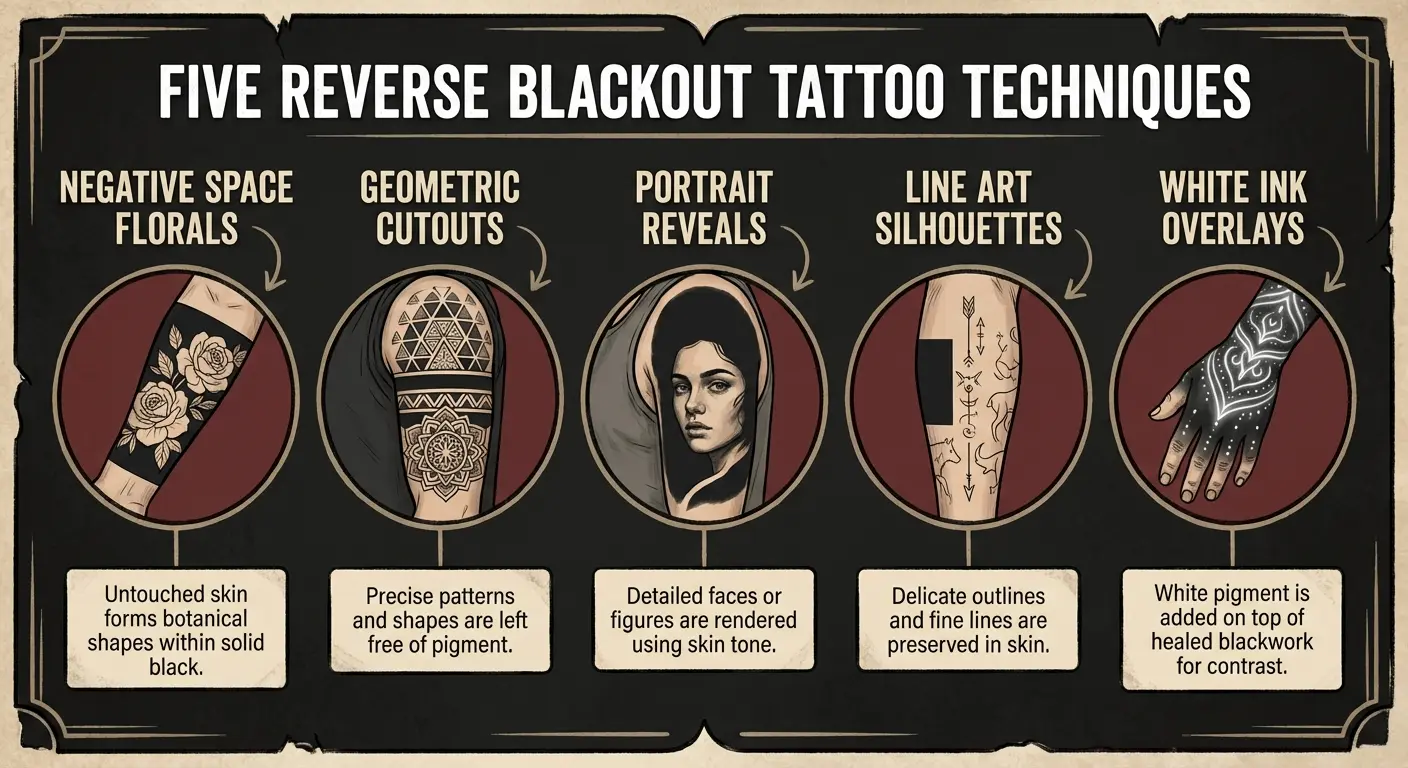
Negative Space Mastery: Reverse Blackout Designs
-
Skin-Tone Floral Reverse Blackout
-
Architectural Reverse Blackout Sleeve
-
Portrait Emerging from Blackout
-
Mandala Reverse Blackout Shoulder Piece
-
Minimalist Line Art Reverse Design
-
-
Strategic Cover Solutions: Blackout as Transformation
-
Tribal Cover Blackout
-
Text Elimination Blackout Panel
-
Multi-Tattoo Unification Blackout
-
Scarring Integration Blackout
-
Faded Color Tattoo Reset
-
-
Hybrid Innovation: Blending Blackout with Other Styles
-
Blackout Base with White Ink Overlay
-
Partial Blackout with Realistic Elements
-
Blackout Sleeve with Color Accent Windows
-
Dotwork Transition into Solid Blackout
-
TL;DR – The Quick Version
-
Blackout tattoos aren’t just cover-ups anymore. People get them specifically for the high-contrast aesthetic.
-
Full coverage (like entire sleeves) requires 3-5 sessions and serious commitment, but creates unmatched visual impact.
-
Reverse blackout (using skin tone as the design against black background) lets you create designs impossible with traditional tattooing.
-
Targeted blackout panels solve specific problems (names, tribal, scattered small tattoos) without requiring full coverage.
-
Hybrid approaches (white ink over black, color accent windows, dotwork transitions) combine blackout with other techniques for more complex designs.
-
Visualize it on YOUR body before committing. Looking at other people’s blackout work isn’t enough.
-
Find artists who specialize in blackout specifically and can show healed examples, not just fresh work.
-
Touch-ups are almost always necessary for uniform coverage. Budget for them.
-
This is permanent and highly visible. Make sure you’re ready for both.
Why Blackout Isn’t Just the Nuclear Option
Most people think blackout tattoos are plan Z. What you do when you’ve exhausted every other option and you’re desperate. And look, sometimes that’s exactly what they are. I’m not gonna pretend everyone walking in for blackout coverage is making some calculated artistic statement. Sometimes it’s just “I need this ex’s name gone and I need it gone NOW.”
But here’s where it gets interesting: about 40% of the blackout work we do now is for people with zero existing ink. They come in specifically requesting blackout designs. No cover-up needed. They just want that high-contrast, bold-as-fuck aesthetic that you can’t get any other way.
The psychology of it makes sense once you think about it. Traditional cover-ups always carry the ghost of what’s underneath. You know it’s there. Everyone who knows your history knows it’s there. It’s like painting over a stain. You can cover it, but you’re always aware of what you’re covering.
Blackout is different. It’s obliteration. There’s something psychologically clean about it, even if the process is messier than a traditional cover-up. You’re not hiding the old tattoo under a new design. You’re erasing it. Starting over. That appeals to a certain type of person who needs closure, not clever incorporation.
At its core, a blackout tattoo involves saturating a section of skin with solid black ink to create complete coverage. This can range from small panels to entire limbs, and the technique serves both aesthetic and practical purposes that extend far beyond simple cover-up work. Understanding what is a blackout tattoo helps clarify why this technique has gained such momentum in contemporary body art.
Blackout and blackwork tattoos have emerged as two of the most interesting and popular kinds of tattoos in recent years. While initially the modern version of this technique was used primarily as a method to cover up unwanted tattoos, the solid black ink providing a fresh canvas for either new artwork or serving as a bold statement piece in its own right, the application has evolved far beyond simple cover-up work, according to tattoo professionals at The Honorable Society.
Today’s blackwork tattoos incorporate negative space, intricate designs, and techniques such as dotwork, linework, and geometric patterns to add depth and complexity that transforms them from practical solutions into sophisticated artistic statements. The question of why blackout tattoo work appeals to so many people often comes down to the psychological dimension: the ability to reclaim your skin and your narrative.
There’s also the overlooked angle: blackout tattoos are future-proofing. Once you have solid black coverage, you’ve created a canvas that can be reworked with reverse techniques, white ink overlays, or even laser removal for specific sections if preferences change. Traditional tattoos limit your options. Blackout work opens them.
The contrast opportunities are what excite me most. You can’t achieve certain design effects with traditional tattooing. Intricate patterns in skin tone against solid black? Impossible without blackout as your foundation. White ink that genuinely pops instead of looking muddy? You need that black background. Geometric windows that frame specific body areas? Blackout makes it work.
We’re watching blackout evolve from its cover-up origins into a legitimate artistic technique that stands on its own merits. The question isn’t whether blackout is a desperate last resort. The question is whether its unique advantages align with what you want from your body art.
Going All In: Full Coverage Blackout
Committing to full coverage blackout work means something. You’re not testing the waters with a small piece you can hide under a watch. When you black out an entire sleeve, shoulder to chest, or both arms, you’re making a statement that’s impossible to miss.
I’ve guided enough people through full blackout sleeve projects to know what the reality looks like versus what people expect. The commitment is significant. Multiple sessions, extended healing periods, and a dramatic shift in how you present yourself to the world. But for people who want that bold visual impact, nothing else comes close.
What you expect: One session to black out your arm.
What actually happens: Three to five sessions, spaced 4-6 weeks apart, plus a touch-up session three months after the final session.
What you expect: Solid black that looks like the photos immediately.
What actually happens: Solid black that looks dull and possibly patchy for the first 6-8 weeks while it heals, then gradually settles into the true color.
What you expect: To walk out and go about your day normally.
What actually happens: Your arm is tender, swollen, and needs to be kept clean and moisturized for 2-3 weeks. You’ll need to modify your routine.
The multi-session requirement catches people off guard. You can’t achieve proper solid black saturation in one sitting. Your skin needs time to heal between sessions, and the artist needs to assess how the first pass settled before adding more ink. Budget-wise, expect $2,000-4,000 for a full sleeve blackout depending on your location and artist. Major cities cost more. Experienced blackout specialists cost more. It’s expensive, but it’s also 15-20 hours of work spread across multiple sessions.
Healing takes longer than traditional tattoos because you’re saturating large areas with solid ink. The outer layer heals in 2-3 weeks, but complete healing takes up to 2 months. During that time, the black will look dull and may appear patchy. This is normal. The true color emerges after complete healing.
Pain management becomes crucial for full coverage work. You’re sitting for hours at a time while an artist goes over the same areas repeatedly to achieve solid saturation. The intensity is higher than traditional tattoos, and the tenderness continues for days after each session. I recommend scheduling sessions when you can take the following day off to rest.
Fair warning: blackout sleeves hurt more than traditional tattoos. You’re getting solid saturation over large areas, which means your artist is going over the same spots repeatedly. And it’s not quick. Each session is 3-5 hours minimum. The inner arm, the ditch of your elbow, the inside of your wrist… these spots are brutal. If you have low pain tolerance, maybe test it with a smaller blackout panel before committing to a full sleeve.
1. Full Sleeve Blackout
A complete arm blackout from shoulder to wrist eliminates whatever existed before and creates maximum visual impact. We’re talking about transforming your entire arm into a solid black canvas that demands attention.
Planning a full blackout tattoo sleeve requires realistic expectations about the process. Most people need 3-5 sessions depending on arm size and the density of existing ink underneath. If you’re covering heavily saturated color work or dense black tribal pieces, expect to be on the higher end of that range.
Achieving uniform solid black coverage is harder than it looks. Your artist needs to go over the same areas multiple times, ensuring no spots are missed and the saturation remains consistent throughout. Areas with dense scar tissue from previous tattoos require extra attention and often additional passes to accept ink properly.
I recommend leaving small gaps at major joints, like the inside of your elbow. These areas flex constantly and heal differently than surrounding skin. A tiny break in coverage at the elbow crease helps with flexibility and reduces the risk of the ink looking patchy as it settles.
Touch-ups are almost always necessary because your body metabolizes ink at different rates across various arm sections. The inner arm typically holds ink differently than the outer arm. The forearm may heal differently than the upper arm. Your artist will assess these variations during follow-up sessions and add ink where needed to maintain uniform appearance.
I’m not gonna lie: the first time you see your arm completely blacked out, it’s jarring. Even if you planned it, even if you wanted it, seeing that much solid black on your body takes adjustment. Give yourself a few weeks to get used to it before deciding if you made a mistake. Most people I’ve worked with go through a “what the fuck did I do” phase around week two, then settle into loving it by month two. If you’re still hating it at six months, that’s different. But initial shock is normal and doesn’t mean you made the wrong choice.
Your clothing choices will shift. A full blackout sleeve is visible unless you’re wearing long sleeves, and even then, it often shows at the wrists. I’ve watched people embrace this visibility as part of their personal brand, but consider how it aligns with your professional environment and personal comfort level.
2. Blackout Arm Tattoo with Geometric Windows
Combining solid blackout coverage with precisely planned negative space in geometric shapes creates visual interest while maintaining bold impact. Triangles, hexagons, circles, and custom geometric shapes that reveal skin tone or allow for future detailed work within the windows.
When planning geometric windows within your blackout arm tattoo, consider using a geometric tattoo generator to visualize precise shapes and proportions before committing to negative space placement.
You must plan these windows before starting the blackout. Adding them later requires laser removal or accepting imperfect edges. The precision of geometric shapes against solid black backgrounds means any irregularities are immediately obvious.
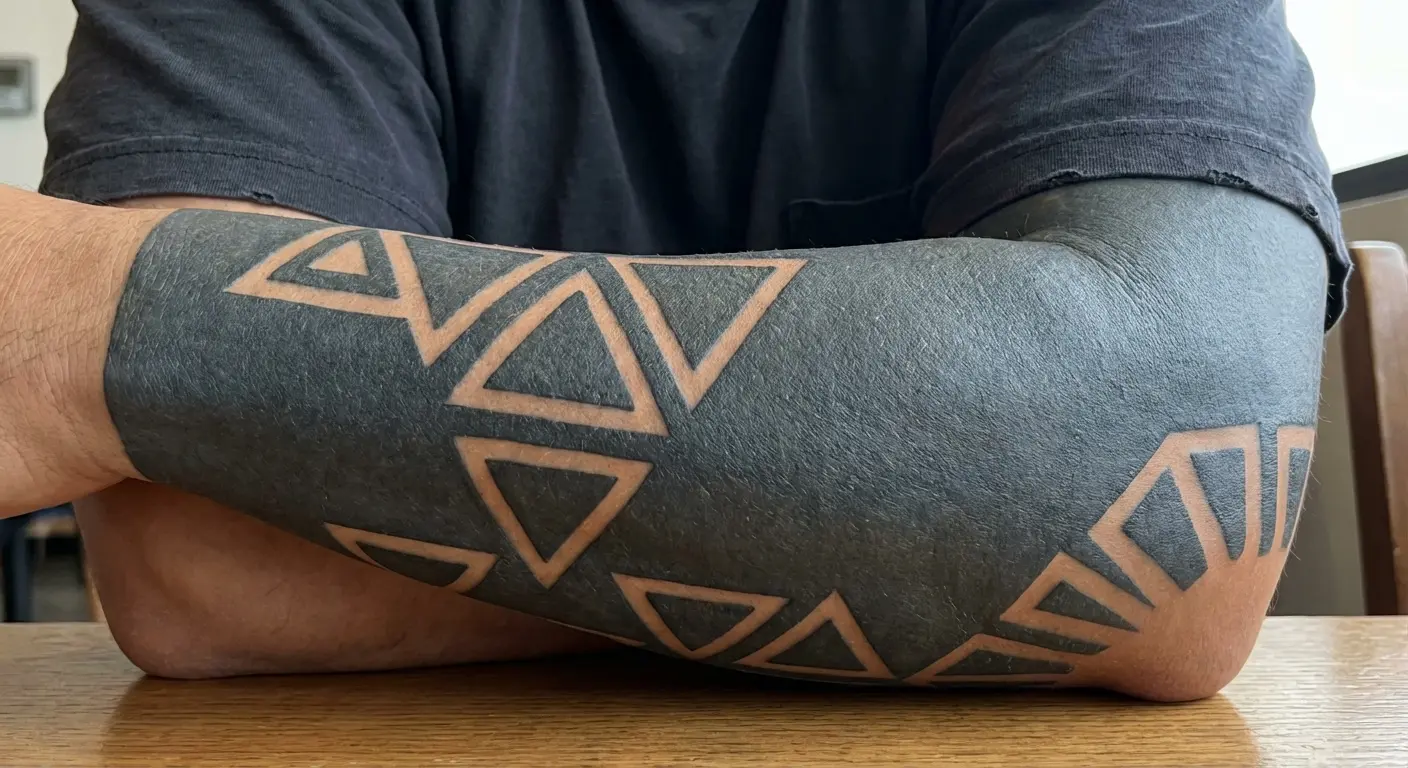
The appeal of this approach is clear. You get blackout’s dramatic effect without complete visual uniformity. The geometric windows break up the solid black and create focal points that draw the eye. Some people leave these windows empty, enjoying the contrast of skin tone against black. Others use them as frames for future detailed work: portraits, symbols, or intricate patterns that benefit from the high-contrast background.
Working with artists who specialize in precise linework is non-negotiable for this style. The geometric shapes need crisp, clean edges to maintain their impact against the solid black background. Any wobble or inconsistency in the lines undermines the entire piece’s geometric precision.
I’ve seen people use geometric windows strategically to preserve favorite elements from existing tattoos. If you have one piece you want to keep among a collection you’re ready to eliminate, a geometric window can frame and highlight it while blacking out everything else. This creates a curated, intentional look from what might have been scattered, unrelated tattoos.
A blackout arm tattoo with geometric windows represents a sophisticated approach that balances bold coverage with thoughtful design elements, creating a piece that’s both dramatic and nuanced.
3. Double Arm Blackout Symmetry
Matching blackout sleeves on both arms create a balanced, intentional aesthetic that clearly signals choice rather than cover-up desperation. The symmetry makes a statement: this wasn’t a panicked decision to hide something. This was planned.
Most people who complete one blackout arm eventually want the symmetry of matching both. I’ve watched this pattern play out repeatedly. Someone commits to one arm, lives with it for a few months, and realizes the asymmetry bothers them. The single blackout sleeve looks intentional, but the matching pair looks complete.
The decision-making process for committing both arms versus testing one first comes down to certainty. If you’re confident about wanting blackout coverage, starting both arms simultaneously can make sense. But if you’re testing whether you’ll be comfortable with this much visible black ink, completing one arm first gives you time to adjust before doubling down.
Practical timing matters. You need to space out the work so you always have one functional arm during healing. I recommend completing one arm entirely before starting the other, or alternating sessions between arms if you’re working with an artist who can maintain consistency across both. Having both arms healing simultaneously makes basic tasks difficult and increases infection risk if you can’t keep both areas properly clean.
High-profile artists continue to embrace blackout aesthetics in 2026, with Machine Gun Kelly recently adding new ink that sits at the edge of his massive blackout tattoo. Berlin-based tattoo artist Zopfi Csepai gave fans a close look at the musician’s latest addition on Instagram in March 2026, showing how MGK incorporated his daughter Saga’s name in capital letters on the back of his right hand, positioned strategically alongside his existing blackout work, according to iHeart. The placement demonstrates how blackout tattoos can serve as foundations for future meaningful additions while maintaining their bold visual impact.
One practical thing nobody mentions: having both arms blacked out means you can’t hide it. Ever. Long sleeves help but you’ve still got your hands showing, and people notice the transition from black sleeves to normal hands. You’re committing to being “the person with blacked out arms” in every context. Some people love that identity. Others realize too late they wanted the option to blend in sometimes. Think about which type you are.
Double blackout sleeves shift perceptions in professional environments. Some industries are more accepting than others. Creative fields, tech startups, and service industries with younger demographics tend to be more comfortable with visible tattoos, including dramatic blackout work. Traditional corporate environments, finance, and law remain more conservative. Research your specific sector and company culture before committing to double arm coverage that’s difficult to conceal.
Geography matters more than people think. Blackout sleeves in Portland or Brooklyn? Pretty normalized. Same coverage in a small Southern town or conservative Midwest suburb? You’ll stand out more. I’m not saying don’t do it. I’m saying factor in where you actually live and work, not where you wish you lived.
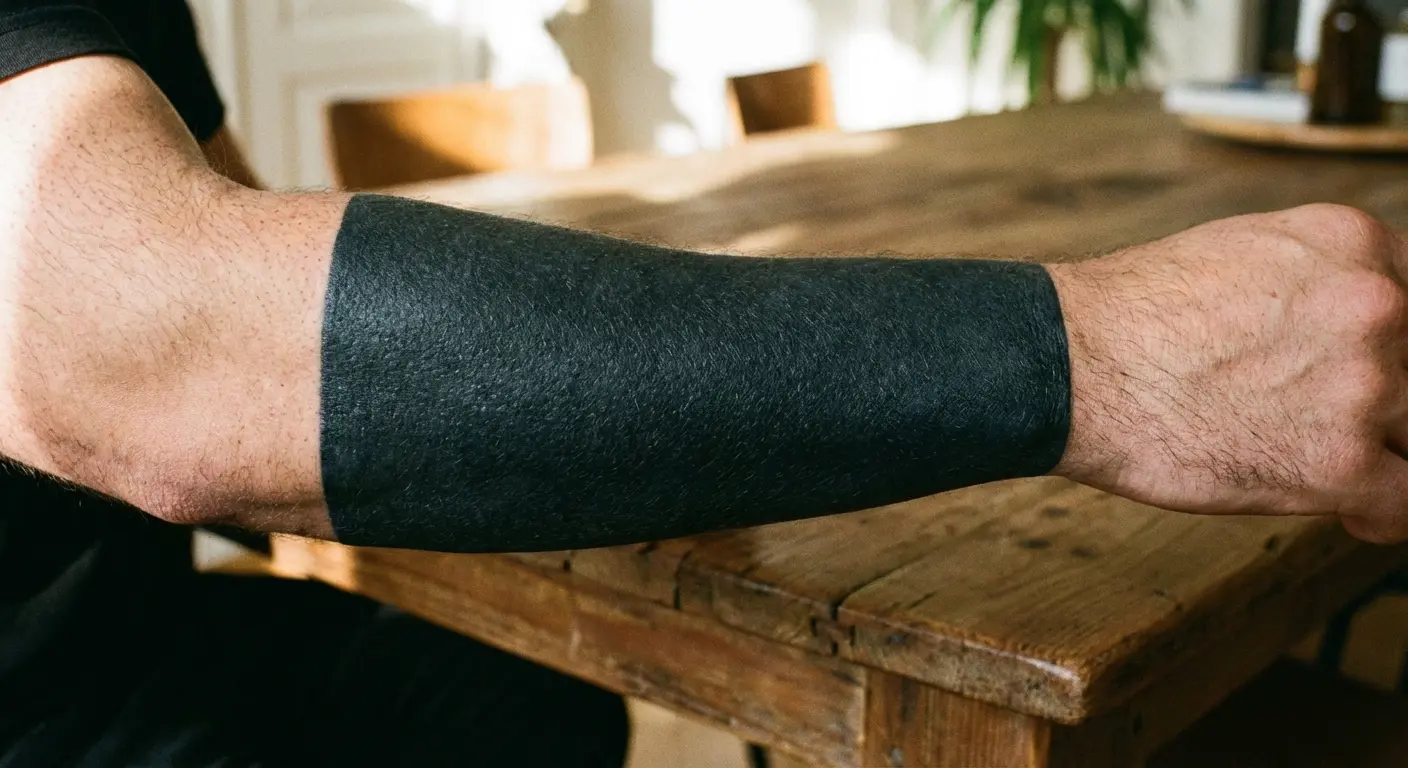
4. Blackout Shoulder to Chest Extension
Extending blackout coverage from the shoulder across the chest creates a bold statement piece that works particularly well for unifying mismatched shoulder and chest tattoos. The flow from shoulder to chest creates visual continuity that’s hard to achieve with traditional tattooing.
You’re tattooing solid black across areas with different skin textures and pain tolerances. The bony shoulder cap is one experience. The sensitive chest area near the sternum is another entirely. Most people find chest blackout work significantly more uncomfortable than arm or shoulder coverage.
Healing complications are more common with chest blackout work because of clothing friction. Your shirt constantly rubs against the healing tattoo, which can pull ink and cause patchy healing. I recommend loose-fitting clothing and being prepared for the area to remain tender longer than arm blackouts.
This placement often requires more touch-up work than arm blackouts because the chest area metabolizes ink differently. The skin is thinner in some areas, thicker in others, and the constant movement from breathing affects how the ink settles. Your artist will likely schedule a follow-up session specifically to address any areas that didn’t hold ink uniformly.
The decision of whether to extend coverage to the nipple area or work around it affects the overall visual flow. Some people prefer complete coverage for uniformity. Others find the sensitivity of tattooing directly over nipples too intense and choose to work around them. Both approaches can look intentional if planned properly, but you need to decide before starting the blackout because changing your mind mid-project creates awkward visual breaks.
A blackout shoulder tattoo that extends to the chest represents one of the most dramatic applications of this technique, transforming the upper torso into a unified canvas that commands attention.
Surgical Strikes: Targeted Blackout Applications
Not every blackout tattoo needs to cover an entire limb. Sometimes you need surgical precision: a targeted black out tattoo application that solves a specific problem without the commitment of full coverage work.
I’m seeing more people choose strategic blackout panels, bands, and sections that address particular challenges. Maybe you have one regrettable tattoo among several you want to keep. Maybe you need to eliminate a name or quote that no longer resonates. Maybe you want to create contrast for surrounding ink without blacking out everything.
Targeted blackout applications can be more effective than traditional cover-up techniques for certain types of unwanted ink. Traditional cover-ups require designing around the old tattoo’s shapes and often result in significantly larger pieces to achieve adequate coverage. Blackout panels eliminate the old tattoo completely and can be sized precisely to the problem area without unnecessary expansion.
Understanding when targeted blackout makes sense versus when full coverage is the better choice matters. If you’re dealing with one or two specific problem tattoos, targeted applications work well. If you’re unhappy with an entire collection of scattered pieces, full coverage might provide a cleaner solution.
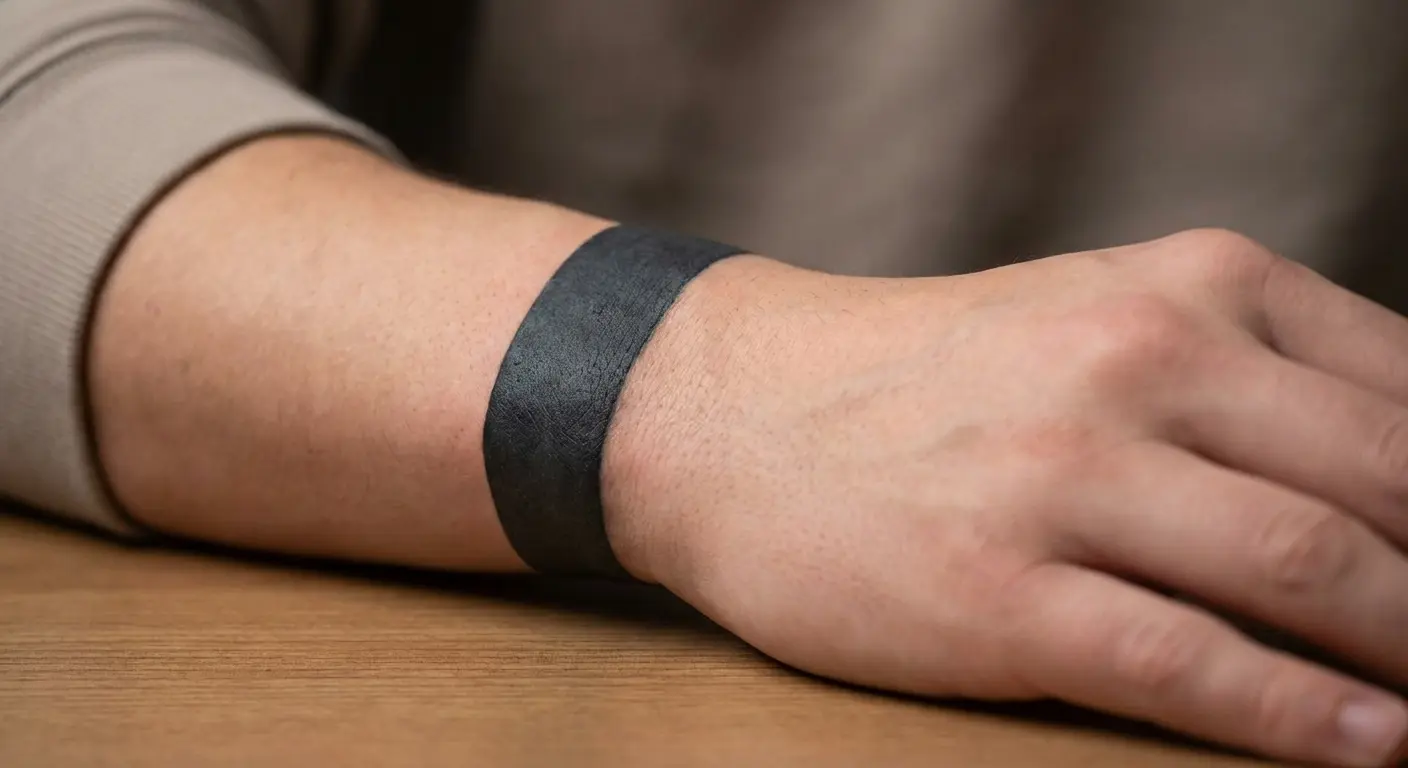
5-8. When You Don’t Need the Nuclear Option
The wrist band is the move I recommend most for testing the waters. It’s 1.5 to 3 inches of solid black circling your wrist. Basically a permanent bracelet that happens to cover that infinity symbol you got at 19. The wrist is a bitch to tattoo (thin skin, lots of nerve endings, constant movement), but it’s also small enough that you’re not committing to 10 hours in the chair. You’ll know pretty quick if you can handle the look of solid black on your body.
Width matters more than you might expect. Too thin and the band looks like a bracelet: decorative but insubstantial. Too wide and it overwhelms the wrist’s proportions, making your hand look disconnected from your arm. Most effective blackout wrist tattoos fall between 1.5 to 3 inches in width, though this varies based on your wrist size and overall arm proportions.
The skin is thin and sensitive. Achieving solid black saturation is challenging and often requires multiple passes. The wrist flexes constantly, which affects healing and can cause the ink to look patchy if not applied properly. I recommend artists experienced specifically with blackout wrist tattoo applications because the technique differs from tattooing thicker skin areas.
Healing requires extra attention because the wrist is constantly exposed and moving. You’ll need to be diligent about keeping the area clean and moisturized, and prepared for the healing process to take slightly longer than less mobile areas.
Forearm panels are the precision tool for targeted elimination. Got one tattoo you hate surrounded by three you love? Black out a rectangle or organic shape just over the problem area. The trick is making the panel look intentional, not like a censorship bar. Work with your artist on the shape. Hard geometric edges read as modern and deliberate. Soft organic borders can blend better with traditional work around it.
Shape options significantly affect how the panel integrates with existing tattoos. Hard geometric edges create a modern, intentional look that clearly signals design choice. Organic flowing borders feel softer and can blend more naturally with surrounding traditional tattoo work. Your choice depends on the aesthetic you’re building and how the panel relates to other pieces on your arm.
The strategic advantage of panel blackouts over traditional cover-ups is significant. You don’t need to design around the old tattoo’s shapes. You don’t need to expand the coverage area dramatically to hide what’s underneath. You simply black out the problem area and move on. This creates opportunities for future reverse blackout work or white ink overlays within the panel if you decide you want imagery there later.
I’ve worked with people who use forearm panels to create visual breaks between upper arm and lower arm tattoos, essentially using the blackout as a design element that separates different tattoo collections or styles. This approach works particularly well if you have traditional work on your upper arm and want to start fresh with a different style on your forearm.
Gradually transitioning from solid black at the elbow to skin tone at the wrist creates a softer blackout effect that feels less abrupt than hard-edged coverage. The gradient approach appeals to people who want coverage without stark visual termination.
The technical challenge of creating smooth gradients with tattoo ink is substantial. You can’t truly blend tattoo ink the way you blend paint. Instead, artists use dotwork or careful saturation variation to create the illusion of gradual transition. This requires significant skill and multiple sessions to achieve smooth results.
Gradients are expensive and time-consuming because they require multiple sessions and almost always need touch-ups. The transition from solid black to skin tone involves thousands of individual dots or careful saturation variation, and achieving smooth results takes time. Budget for at least 30% more than you’d pay for a hard-edged blackout of the same size.
Touch-ups are almost always necessary to maintain smooth transitions. Different areas of your arm heal at different rates and metabolize ink differently. What looks like a smooth gradient immediately after tattooing may develop visible bands or uneven sections as it heals. Your artist will need to assess the healed gradient and add ink strategically to maintain the smooth transition.
Covering just the rounded shoulder cap with solid black creates a bold focal point that works well for eliminating shoulder tattoos or creating contrast for surrounding pieces. The shoulder cap’s prominence makes it an ideal location for statement blackout work.
Pain levels for blackout shoulder tattoo applications are among the higher experiences in blackout tattooing. The proximity to bone and nerve endings means you’ll feel every pass of the needle intensely. Most people find the top of the shoulder cap particularly uncomfortable, while the sides are slightly more tolerable. This area often requires multiple sessions for complete saturation because sitting through the pain for extended periods becomes difficult.
How shoulder cap blackouts integrate with chest pieces, back pieces, and sleeve work determines their effectiveness as visual anchors. A shoulder cap blackout can serve as a transition point between a chest piece and a sleeve, creating a bold separator that defines where one piece ends and another begins.
The decision of where to terminate the blackout affects integration with surrounding skin and ink. A sharp line creates a modern, intentional look but requires precise execution to avoid appearing unfinished. A feathered edge using dotwork or gradient techniques creates a softer transition but requires more sessions and careful planning to execute properly.
I’ve noticed shoulder cap blackouts appeal particularly to people who have shoulder tattoos they regret but want to preserve arm or chest work. The shoulder cap becomes a reset button that eliminates the problem area while leaving everything else intact.
Tattooing Backwards: Reverse Blackout Explained
Okay, this is where blackout work gets actually interesting.
Reverse blackout is basically tattooing in negative. Instead of adding ink to create the design, you’re adding ink everywhere except the design. The design is the absence of ink. Your skin tone becomes the art against a solid black background.
It’s a mindfuck to plan because you’re thinking backwards. Most people can’t visualize it until they see examples. And when they do see it? Either they immediately get it and want it, or they don’t get it at all. There’s not much middle ground.
The creative possibilities with reverse blackout are what excite me most. You can achieve designs that would be impossible with traditional tattooing. Intricate patterns that would require impossibly fine linework become achievable when you’re leaving skin tone rather than adding ink. Portraits that use skin tone as highlights create dramatic, high-contrast imagery that traditional techniques can’t match.
Planning considerations for reverse work are more demanding than standard blackout applications. You need to know exactly what the final design will look like before starting because you’re essentially working in reverse. The black background gets applied first, and the design emerges from what you leave behind. There’s no room for improvisation or adjusting the design as you go.
The technical skill required for reverse blackout work is substantial. Your artist needs to maintain precise edges around the negative space elements while achieving solid saturation in the black background. Any wobble in the edges or inconsistency in the black coverage undermines the entire piece’s impact.
A reverse blackout tattoo demands a level of planning and precision that sets it apart from traditional tattoo applications, making it essential to work with artists who specialize in this particular technique.
Not all reverse blackout techniques age the same way, and nobody talks about this enough.
Skin-tone negative space (like florals or organic shapes) looks incredible fresh but has one major variable: your skin tone changes over time. Sun exposure, aging, weight changes… all of it affects how the design reads. On lighter skin, you’ve got high contrast that stays pretty consistent. On medium to darker skin tones, the contrast is softer but often more sophisticated. Just know that what you see at 25 might look different at 45, and there’s no touch-up that fixes natural skin tone changes.
Geometric patterns and mandalas age the best IF (and this is a big if) the artist nails the precision on the first pass. Clean lines stay clean. Wobbly lines get wobblier. There’s no hiding imperfections in geometric work against solid black. But when it’s done right, it holds up better than almost any other tattoo style because the high contrast doesn’t fade the way color does.
Portrait work in reverse blackout is unforgiving as hell. The technique makes aging changes more visible, not less. As the tattoo ages and the edges soften slightly, portrait features can distort. I’ve seen reverse blackout portraits that looked incredible at year one and questionable by year five. If you’re going this route, choose an artist who’s been doing it for at least a decade and can show you healed examples, not just fresh work.
White ink overlays are the maintenance queens of reverse blackout. White ink fades faster than any other color. Plan on touch-ups every 1-2 years if you want it to stay crisp. Some people are fine with the faded look. Others get frustrated with the upkeep. Know which type you are before committing.
9. Skin-Tone Floral Reverse Blackout
Leaving flower shapes, leaves, and botanical elements in skin tone against a solid black background creates striking contrast impossible to achieve with traditional tattoo techniques. The graphic, almost woodcut quality appeals to people seeking bold, artistic tattoos rather than realistic representations.
For those interested in exploring botanical elements before committing to reverse blackout work, experimenting with a flower tattoo generator can help you visualize how different floral shapes will appear in negative space against solid black backgrounds.
The precision required to create clean edges around negative space elements is extreme. Your artist is essentially sculpting the design by carefully tattooing around it, leaving the flower shapes untouched while filling everything else with solid black. Any imperfection in the edges becomes immediately obvious because of the stark contrast.
Skin tone elements will appear different on different skin tones, which you should consider during the design phase. On lighter skin, the contrast between black and skin tone is dramatic and creates maximum impact. On medium to dark skin tones, the contrast is slightly softer but often more sophisticated, with the skin tone elements reading as warm highlights against the cool black background. This technique works particularly well for people with medium to dark skin tones who want high-contrast designs that celebrate their natural skin color.
The botanical subjects that work best for reverse blackout tend toward bold, recognizable shapes rather than delicate, intricate details. Large petals, strong leaf shapes, and clear floral silhouettes read well from a distance. Tiny details and fine lines can get lost or appear muddy as the tattoo ages and the edges soften slightly.
10. Architectural Reverse Blackout Sleeve
Using negative space to create building silhouettes, geometric structures, or architectural elements against blackout backgrounds produces dramatic, sophisticated designs. I’m seeing this approach appeal particularly to people in creative and technical fields who want tattoos that reflect precision and planning.
The design process for architectural reverse work requires careful attention to perspective and scale. Buildings and structures need to maintain their proportions and architectural accuracy even when wrapped around curved body surfaces. Skilled artists compensate for body contours to keep lines appearing straight and structures appearing properly proportioned from multiple viewing angles.
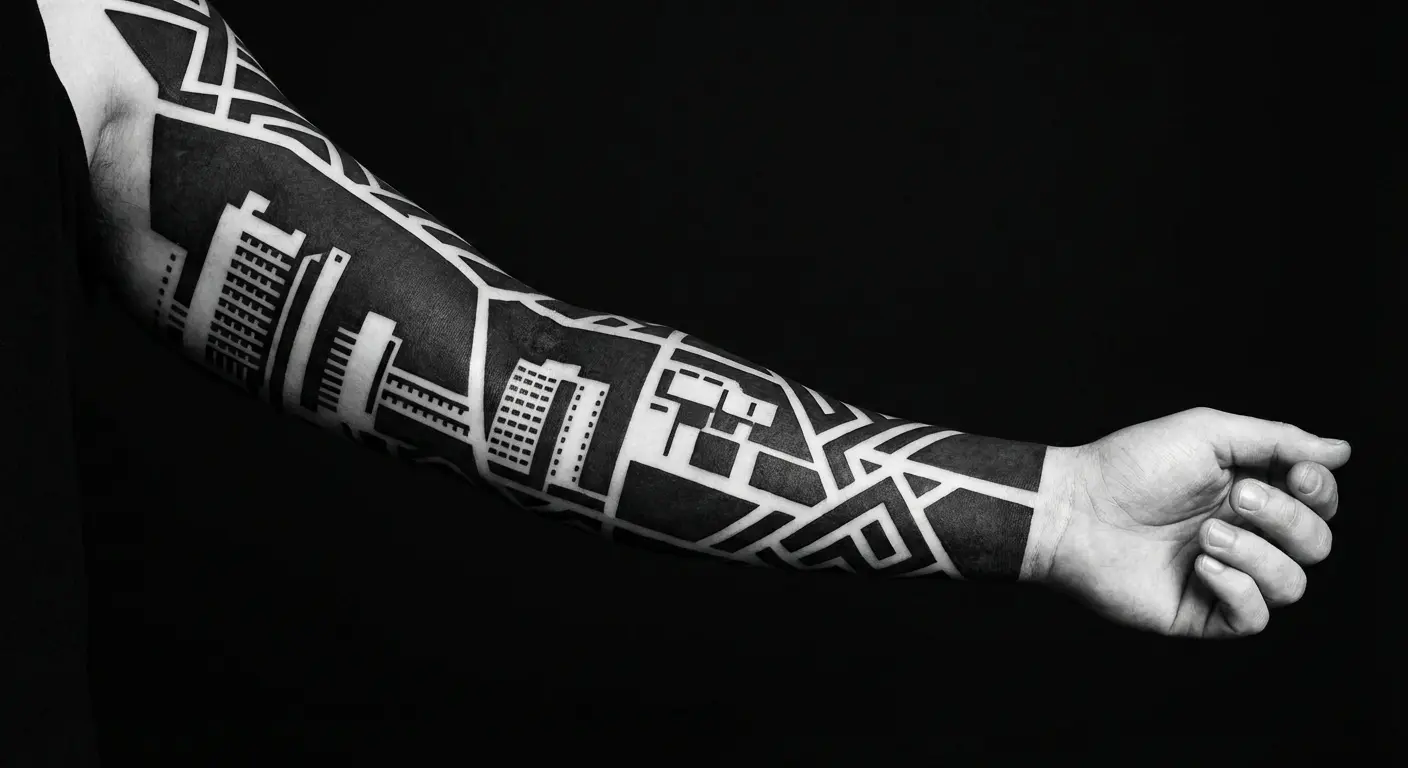
Why architectural reverse blackout resonates with certain personality types is interesting. These designs signal intentionality, planning, and appreciation for structure. They’re the opposite of spontaneous, organic tattoo work. People who choose architectural reverse blackouts often work in fields that value precision (engineering, architecture, design, programming) and want body art that reflects those values.
The challenge of maintaining architectural accuracy while working on curved body surfaces requires significant technical skill. Your arm isn’t flat. Buildings with straight lines need to be adjusted slightly to account for the arm’s curvature, or they’ll appear distorted when viewed from certain angles. This is where artist experience matters tremendously.
Multiple viewing angles create depth in architectural reverse blackout sleeves. A cityscape might wrap around the arm so different buildings appear as you rotate your arm. A single structure might be positioned so different facades are visible from different angles. This three-dimensional thinking elevates architectural reverse work from simple imagery to sophisticated design.
11. Portrait Emerging from Blackout
Creating a portrait where skin tone forms the highlights and solid black creates shadows and background produces a haunting, high-contrast effect. This technique works better for certain portrait subjects than others, and the results can be stunning when executed properly.
Faces with strong bone structure and dramatic lighting translate best to reverse blackout portraits. High cheekbones, defined jawlines, and prominent features create the contrast needed for the portrait to read clearly. Soft, round faces with subtle features can get lost in the high-contrast treatment.
Choose your portrait subject carefully. High-contrast reverse blackout makes sense for certain faces and not others. Strong bone structure, defined features, dramatic lighting… these translate well. And here’s the uncomfortable truth: this technique tends to work better for memorial portraits than living people, because the haunting, emerging-from-darkness quality fits the memorial context. For living people, it can read as overly dramatic or morbid.
The unforgiving nature of reverse blackout portraits demands artists with significant portrait experience. There’s no room for correction if proportions are wrong. You can’t adjust the nose slightly or move the eyes a bit. The high contrast makes any errors immediately obvious, and fixing them requires laser removal or accepting imperfect results.
Many people choose this technique to honor loved ones because the dramatic presentation creates powerful emotional impact. The stark contrast and bold treatment elevate the portrait beyond typical memorial tattoos. There’s something haunting and beautiful about a face emerging from solid black, as if the person is stepping out of darkness into light.
Technical execution requires planning the light source and shadow placement before starting the blackout. The artist needs to determine which areas will be skin tone (highlights and mid-tones) and which will be solid black (shadows and background). This planning phase is critical because once the black goes in, there’s no adjusting the lighting or shadow placement.
12. Mandala Reverse Blackout Shoulder Piece
Intricate mandala patterns in skin tone against solid black backgrounds create mesmerizing geometric designs with perfect symmetry. The radial symmetry and detailed patterns benefit tremendously from the stark contrast this technique provides.
Mathematical precision is required to create balanced mandalas that maintain symmetry across curved shoulder surfaces. The shoulder cap isn’t flat, which means the mandala needs to be adjusted to account for the body’s contours while maintaining the appearance of perfect symmetry from the front view. This requires careful planning and often multiple reference points during application.
Stencil work becomes crucial for mandala reverse blackouts because freehand execution of complex geometric patterns is nearly impossible to execute with the precision required. Your artist will likely create a detailed stencil that maps the mandala onto your shoulder, accounting for body contours and ensuring all elements align properly.
Look, I’m not gonna pretend mandalas are for everyone. Some people see the spiritual significance. Others just think they look cool. Both are valid reasons to get one. But if you’re doing it because mandalas are trendy, maybe sit with the design for a few months first. Trends fade. Tattoos don’t.
How mandala reverse blackouts can extend beyond the shoulder to incorporate chest, back, or arm areas affects the design’s focal point and visual flow. A mandala centered on the shoulder cap creates a strong focal point. Extending the pattern onto the chest or back creates a larger, more immersive design. Allowing elements to flow down the arm creates movement and visual interest.
13. Minimalist Line Art Reverse Design
Simple, clean designs (single-line drawings, basic shapes, minimalist icons) in skin tone against blackout backgrounds create maximum impact with minimum detail. This approach appeals to people who want bold tattoos without visual complexity.
The challenge of maintaining clean, precise lines in negative space work is significant. Even small imperfections become obvious against solid black backgrounds. A line that wobbles slightly or a shape with an uneven edge stands out dramatically because there’s nothing else to distract from it. This is where artist skill becomes paramount.
Minimalist reverse blackout designs function as modern, graphic statements that align with contemporary aesthetic preferences for simplicity and boldness. They’re Instagram-friendly, instantly readable, and make strong visual statements without requiring viewers to study them closely to understand what they’re seeing.
The designs that work best for minimalist reverse blackout tend toward iconic, recognizable shapes. Simple florals, geometric shapes, basic symbols, and single-line illustrations translate well. Complex imagery with multiple elements or intricate details works against the minimalist approach and can appear cluttered despite the simplicity of the line work.
How these designs age over time deserves consideration. The simplicity can help maintain clarity as the tattoo ages and edges soften slightly. But simplicity also means there’s nowhere to hide if the lines don’t hold crisp or if the contrast diminishes over time. Regular touch-ups may be necessary to maintain the clean, bold impact.
When Traditional Cover-Ups Won’t Cut It
Let’s talk about tattoo regret, because that’s what brings most people to blackout in the first place.
Traditional cover-ups are great when you’ve got a small-to-medium tattoo that can be incorporated into a larger design. Your artist can work around the shapes, use the existing lines, turn your dolphin into a phoenix or whatever. It’s creative problem-solving.
But some tattoos are unfixable with traditional methods. Ex’s names in huge script. Tribal armbands that are too thick and dark to cover without going three times as large. Collections of shitty small tattoos scattered everywhere with no cohesive flow. Scarring that fucked up the original ink. These are blackout situations.
The types of tattoo regrets that blackout addresses most effectively include unwanted names, outdated tribal work, collections of small tattoos that never cohered, scarring that disrupted previous ink, and faded color work that can’t be refreshed. Each of these problems presents unique challenges that blackout solves more cleanly than traditional cover-up approaches.
14-18. The Cover-Up Situations Where Blackout Wins
There’s a special satisfaction in blacking out tribal tattoos from the ’90s and early 2000s. Maybe it’s because tribal was so ubiquitous that covering it feels like closing a cultural chapter. Maybe it’s because tribal is genuinely difficult to cover with traditional methods and blackout just… solves it.
Before committing to blackout coverage, explore whether your outdated ink might work with a tribal tattoo generator to see if modernizing rather than eliminating is an option, though many find that solid blackout provides the cleanest solution for unwanted tribal work.
Those thick black lines and heavy coverage areas were designed to be bold and permanent. Mission accomplished. They’re so bold and permanent that covering them requires going significantly larger and darker, which often means your cover-up ends up being a massive, heavily shaded piece that you’re not even sure you want.
Blackout doesn’t care. Tribal armband? Black it out with a band that’s maybe an inch wider. Full tribal shoulder? Black out just the shoulder cap. You’re not fighting the existing ink. You’re incorporating it into solid coverage that uses roughly the same amount of ink without requiring a giant new design.
The irony isn’t lost on anyone: covering tribal work with solid black is basically completing what the tribal was trying to do in the first place. Just… all the way.
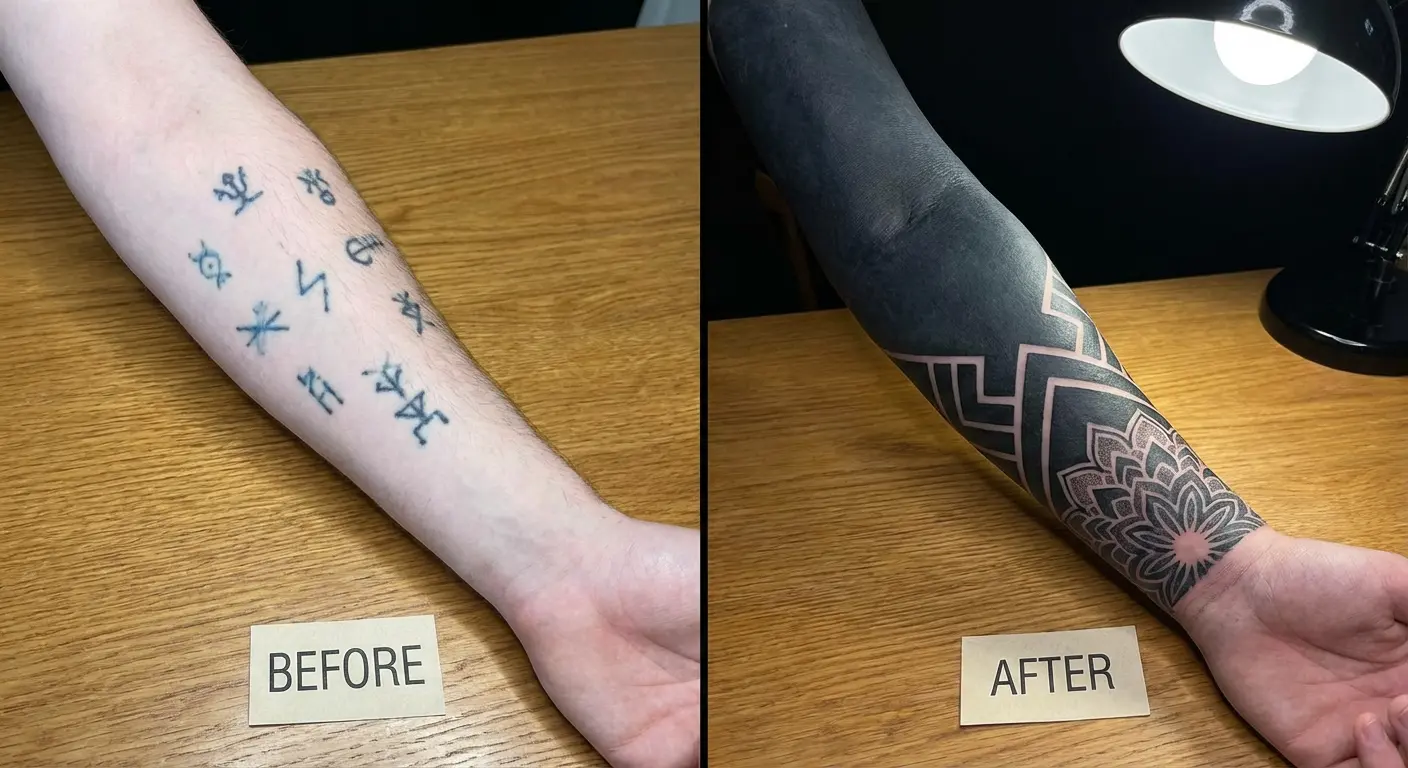
Names, quotes, and text tattoos that no longer resonate can be cleanly eliminated with targeted blackout panels rather than attempting to incorporate them into new designs. Text tattoos rank among the most regretted tattoo types, and blackout panels offer definitive solutions without compromise.
Sizing considerations for text elimination panels require balance. They need to be large enough to completely obscure letters but not so large they overwhelm the body area. I typically recommend extending the panel at least half an inch beyond the text in all directions to ensure complete coverage and create intentional-looking proportions.
Panel shape affects the final appearance significantly. Rectangular panels with hard edges create a modern, graphic look that clearly signals intentional design. Organic shapes with flowing borders feel softer and can integrate more naturally with surrounding tattoos. Your choice depends on your overall aesthetic and how the panel relates to other body art.
The psychological benefit of complete elimination versus the constant reminder of text barely hidden beneath cover-up work is substantial. Traditional cover-ups that incorporate text into new designs mean you’re always aware of what’s underneath. Every time you look at the new tattoo, you know those words are still there, just hidden. Blackout panels erase them completely, providing mental closure along with visual transformation.
I had a client with “ONLY GOD CAN JUDGE ME” across his forearm. He was a public defender. That tattoo was creating problems in court before he even spoke. We blacked out a 4×8 inch panel over it, and he told me later he felt like he could actually do his job without fighting his own appearance first.
Collections of small, unrelated tattoos accumulated over years can be unified under strategic blackout coverage that creates cohesive visual impact from scattered elements. This application works particularly well for people with “tattoo collector” arms or legs where individual pieces never formed a coherent whole.
This is where blackout really shines. If you’ve got an arm covered in random small pieces from different years, different styles, different artists (basically a tattoo scrapbook with no cohesion), traditional cover-up means designing around all of them or going enormous to hide them all.
Blackout lets you edit. Keep the one or two pieces you actually like by leaving geometric windows or negative space around them. Black out everything else. Suddenly your scattered collection looks like an intentional design with curated focal points. You’re not starting completely over. You’re editing your history into something that actually makes visual sense.
The planning process for unification blackout involves deciding which elements to preserve, if any. Some people choose to black out everything and start completely fresh. Others leave negative space windows around favorite pieces, using the blackout to eliminate filler tattoos and create visual hierarchy.
The emotional process of letting go of individual tattoos to create something more cohesive can be challenging. You might have fond memories associated with specific pieces even if you don’t love how they look together. I recommend photographing your existing tattoos before starting the blackout process so you have a record of them, which can help with the emotional transition.
Solid black coverage can incorporate scars from injuries, surgery, or self-harm into tattoo designs while providing psychological closure and physical camouflage. This application requires medical considerations and emotional sensitivity.
Covering Scars: The Conversation Nobody Wants to Have
This section is going to be more careful than the others because covering scars (especially self-harm scars) isn’t just a technical tattoo decision. It’s emotional. It’s complicated. And I’m not a therapist.
What I can tell you is this: blackout coverage over scarring can be powerful for reclaiming your body. The scars stop being the defining feature of that area. The tattoo becomes what people see, what you see. For some people, that’s genuinely healing. The tattoo marks a new chapter.
But make sure you’re covering the scars because YOU want to, not because you think you should, or because someone else wants you to. Scars tell stories. Sometimes those stories need to be told. Sometimes they need to be private. Both are valid.
You need to wait 12-18 months minimum after the injury for complete healing before tattooing. Rushing this timeline risks poor ink retention, infection, and disrupting the scar’s healing process. I know waiting is difficult when you’re eager to cover scars, but patience ensures better results.
Scar tissue often requires multiple passes and different needle configurations to accept ink properly. The texture is different from normal skin (sometimes tougher, sometimes more delicate) and your artist needs to adjust technique accordingly. Some scar tissue accepts ink beautifully. Other scar tissue resists it stubbornly. You won’t know which type you have until the first session.
Ink may not hold uniformly across scar tissue, which is why blackout coverage often provides more consistent results than detailed designs. Detailed imagery can appear distorted across raised or depressed scarring. Solid black coverage creates uniform appearance even if the underlying skin texture varies.
One more thing: some people cover their scars and feel immediate relief. Others cover them and realize the scars were never really the problem. The feelings that caused them were. The tattoo doesn’t fix that. If you’re in that second category, please talk to someone qualified to help with the underlying stuff. The tattoo can wait.
Color tattoos that have faded, blown out, or aged poorly can be reset with blackout coverage rather than attempting color correction or refresh work that may not hold. Certain color tattoos are better candidates for blackout than color restoration.
The assessment process for determining whether a faded color piece can be saved or should be blacked out involves several factors. Remaining pigment density matters. If there’s still substantial color in the skin, refresh work might be viable. Skin texture changes matter. If the tattooed area has significant scarring or texture changes from the original work, new color may not hold well. Whether the original design still appeals to you conceptually matters. If you’ve outgrown the imagery, why invest in restoring it?
Blackout provides a definitive solution that doesn’t require ongoing maintenance or repeated color refresh sessions. Color tattoos need touch-ups every few years to maintain vibrancy. Blackout tattoos, once properly saturated, remain relatively stable with minimal maintenance beyond occasional touch-ups for uniform coverage.
I’ve worked with people whose color tattoos faded due to sun exposure, poor initial saturation, or simply the passage of time. Attempting to restore these pieces often means fighting a losing battle against continued fading. Blackout coverage acknowledges that the color phase is over and creates something new from what remains.
The psychological piece: there’s something about blackout that provides closure in a way traditional cover-ups don’t. Traditional cover-ups incorporate the old tattoo. You’re always aware it’s under there. Blackout eliminates it. It’s the difference between hiding something in your closet and actually throwing it away. Both get it out of sight, but only one gives you that clean-break feeling.
Layering Techniques: When Pure Blackout Isn’t Enough
Pure blackout is bold, but it’s also monochrome. Some people want the impact of solid black but need more visual complexity. That’s where hybrid approaches come in: using blackout as a foundation and building on top of it.

Hybrid approaches layer white ink over blackout, incorporate color accent windows within solid black coverage, transition dotwork into blackout, and blend realistic elements with blackout backgrounds. These combinations create designs impossible to achieve through any single technique.
Understanding blackout as a versatile technique that enhances rather than limits creative possibilities opens up design options that pure blackout or pure traditional tattooing can’t achieve. The solid black becomes a tool in the artistic toolkit rather than the entire solution.
19. Blackout Base with White Ink Overlay
Layering white ink designs over healed blackout coverage creates striking contrast and allows for intricate patterns that glow against the dark background. This technique has become increasingly popular as white ink formulations have improved.
You need to complete blackout work first, allow 6-8 weeks for complete healing, then add white ink in a separate session. You can’t rush this timeline. The blackout needs to be fully healed and settled before adding white ink, or the results will be inconsistent.
White ink over black requires specific pigment formulations and application techniques to achieve opacity. Not all white inks perform equally over solid black backgrounds. Your artist needs to use white ink specifically formulated for coverage work and apply it with enough saturation to show up clearly against the black.
Real talk about white ink over black: it’s high-maintenance. White ink fades faster than any other color, and over black backgrounds, that fading is really obvious. What looks crisp and glowing at six months looks ghostly and faded at two years.
You’re signing up for regular touch-ups if you want to maintain the effect. Some artists won’t even offer white-over-black anymore because clients get frustrated with the upkeep and blame the artist. Make sure you’re realistic about whether you’ll actually come back for touch-ups every year or two, or accept that the white will fade and that might be fine.
The designs that work best are intricate patterns where slight fading doesn’t destroy the overall effect. Delicate florals, geometric patterns, mandala-style work… these can look beautiful even as the white softens. Bold white elements like text or simple shapes tend to look worse as they fade because the contrast is the entire point.
Popular white ink overlay subjects include geometric patterns, delicate florals, and script work. The white-on-black contrast creates a glowing effect that’s particularly striking with intricate, detailed designs.
20. Partial Blackout with Realistic Elements
Combining sections of solid blackout with realistic tattoo elements (portraits, animals, objects) creates dramatic focal points and solves the problem of integrating new realistic work with existing cluttered tattoos. Partial blackout serves as a visual reset that allows realistic elements to stand out.
Composition strategies for balancing solid black sections with detailed realistic work involve understanding visual weight and negative space. The blackout sections provide visual rest areas that make the realistic elements pop. Too much blackout overwhelms the realistic work. Too little blackout fails to create adequate contrast. Finding the balance requires careful planning.
How partial blackout serves as a visual reset is its primary advantage. If you have an arm covered in small, unrelated tattoos but want to add a realistic portrait, blacking out everything except the area reserved for the portrait creates a clean canvas. The portrait becomes the focal point without competing with surrounding ink.
This approach works well for people who want to preserve or add realistic elements while eliminating surrounding tattoos that detract from the focal imagery. You’re not starting completely over, but you’re editing your body art to highlight what matters most.
I’ve seen this technique used to create portrait memorials where the blackout background makes the portrait feel like it’s emerging from darkness. I’ve seen it used to showcase realistic animal tattoos against solid black that makes the subject appear three-dimensional. The applications are limited only by imagination and planning.
21. Blackout Sleeve with Color Accent Windows
Strategic color elements within blackout sleeves create vibrant focal points that pop dramatically against solid black backgrounds. The contrast between saturated color and solid black is visually arresting in ways that color against skin tone can’t match.
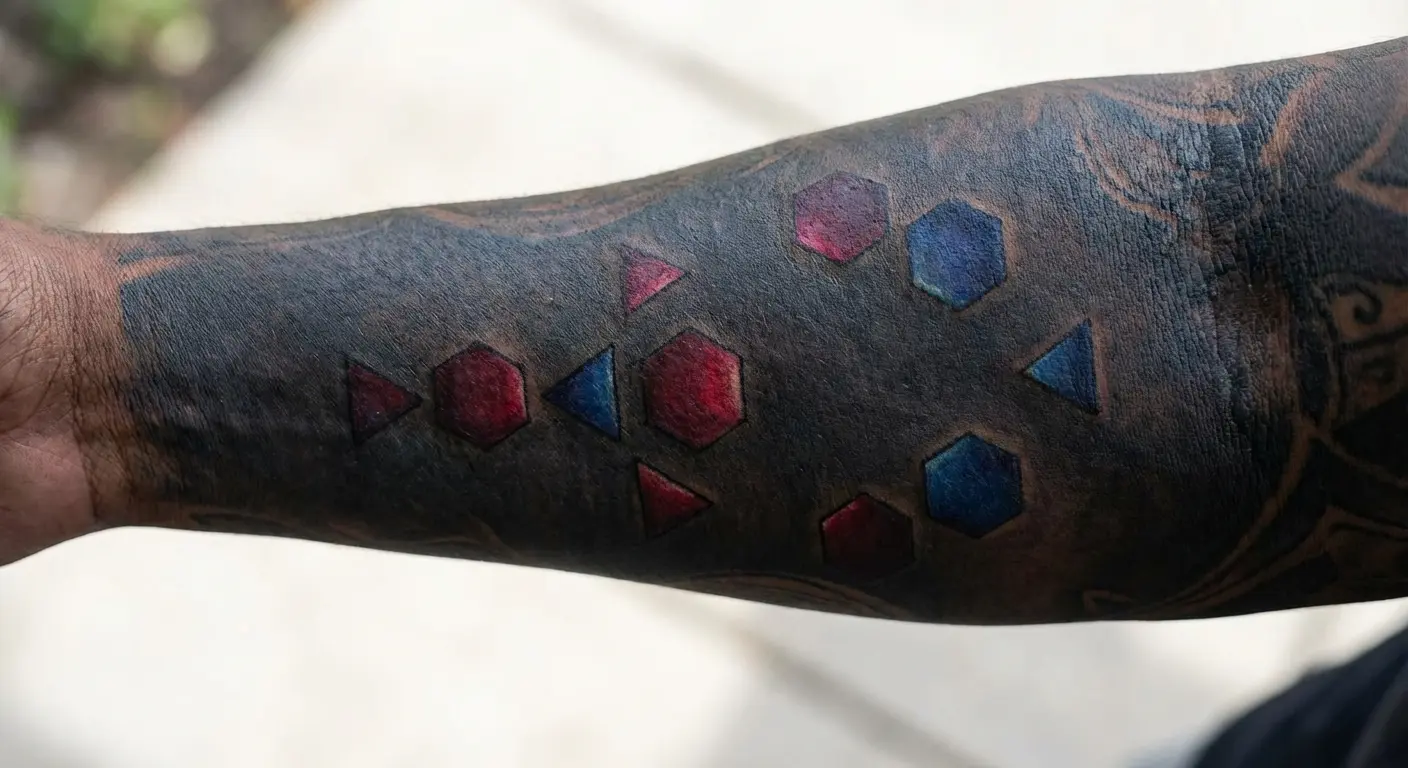
Color selection strategies matter tremendously. Highly saturated, bold colors work best against black backgrounds. Bright reds, electric blues, vivid yellows, and vibrant greens create striking contrast. Pastel colors and muted tones get lost against black and fail to create the impact you’re looking for.
The planning process for color accent placement involves considering window size, shape, and positioning. Small color windows create jewel-like focal points. Larger color sections create bold statements. The shape of the windows (geometric versus organic) affects how they integrate with the blackout coverage. Positioning determines visual flow and how the color elements relate to each other across the sleeve.
Whether to add color elements during initial blackout sessions or in subsequent sessions after the black has healed affects the final result’s precision and color saturation. Adding color during blackout sessions is more efficient but risks color contamination if black ink bleeds into color areas. Adding color after the black has healed ensures clean separation but requires additional sessions.
This technique appeals to people who want blackout’s bold impact but aren’t ready to commit to complete monochrome coverage. The color accents provide visual interest and personality while maintaining the dramatic effect of solid black. A blackout sleeve with carefully planned color windows creates a piece that’s both bold and nuanced.
22. Dotwork Transition into Solid Blackout
Gradually transitioning from intricate dotwork patterns into solid blackout coverage creates organic, flowing designs that feel less abrupt than hard-edged blackout terminations. The technique requires exceptional skill to execute properly.
Let’s be honest: dotwork transitions into solid blackout are beautiful when done right, but they’re also expensive as hell and most artists can’t pull them off consistently.
The technique requires exceptional skill. You’re creating the illusion of a gradient using thousands of individual dots that gradually increase in size and density. Each dot needs to be placed precisely to maintain the smooth transition. One section with inconsistent dot spacing ruins the entire gradient.
And nobody mentions this: these transitions take FOREVER to complete. We’re talking 10-15 hours just for the gradient section on a full sleeve, not counting the solid blackout areas. That’s 3-4 sessions just for the transition zone. Budget accordingly.
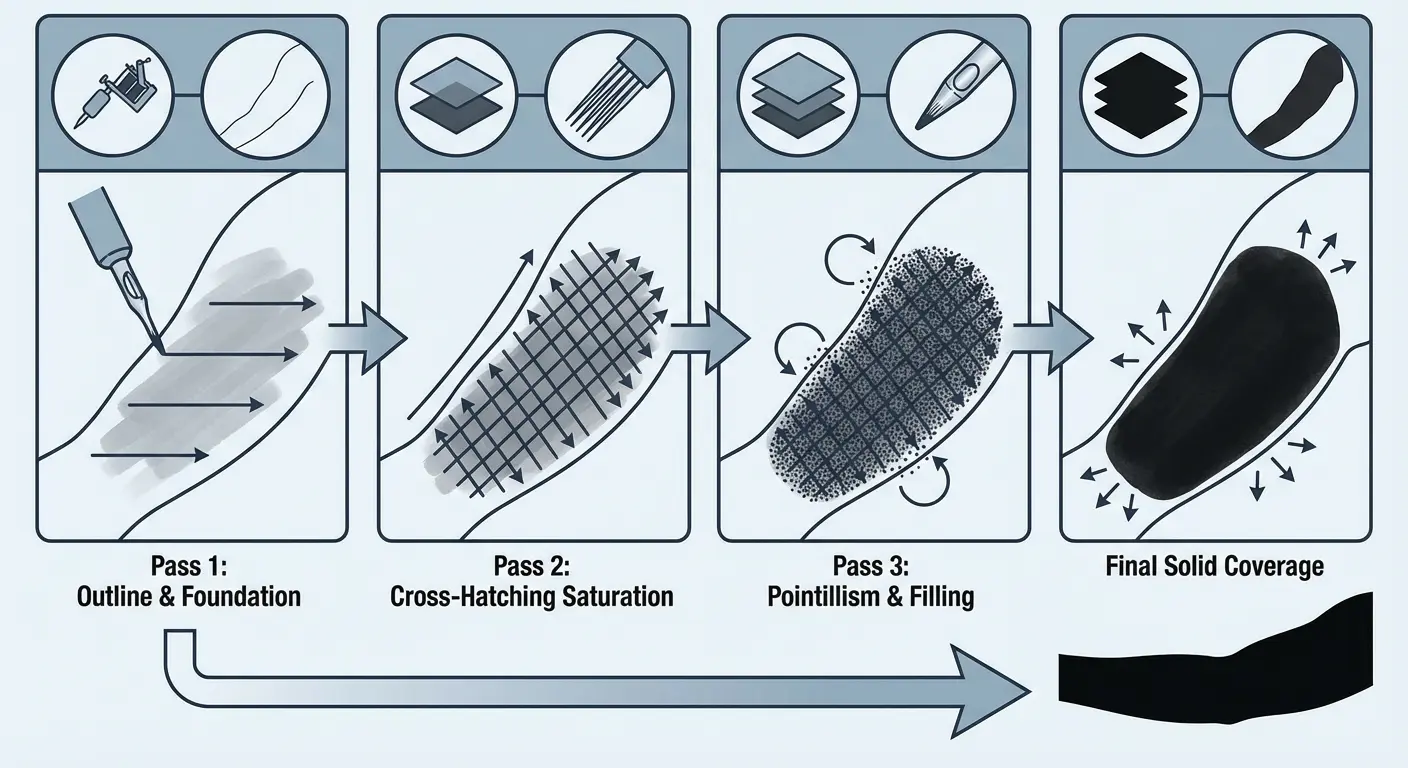
Achieving solid black coverage in blackout tattoos requires mastering specific technical approaches that ensure uniformity and depth. To achieve deep, solid black, artists often go over the same area multiple times, with each pass layering the ink deeper into the skin to ensure no spots are missed and the color remains consistent, according to The Honorable Society. Artists also apply ink in different directions (horizontal, vertical, and diagonal) to eliminate gaps and achieve more uniform appearance.
Healing is also unpredictable with dotwork gradients. The dotted areas heal differently than the solid black areas, and sometimes that creates visible banding where the transition should be smooth. Touch-ups are basically guaranteed, and sometimes multiple rounds of touch-ups.
I’m not saying don’t do it. I’m saying go in with realistic expectations about time, cost, and the high probability that it’ll need refinement. When it works, it’s stunning. But it’s one of the most technically demanding applications in blackout tattooing.
Why dotwork transitions appeal to people who want blackout’s impact without stark visual boundaries is clear. The gradual shift feels more organic and less confrontational than a hard line where blackout coverage begins. It creates visual interest in the transition zone rather than treating it as dead space.
How these transitions can incorporate existing tattoos into the gradient zone adds another layer of complexity and possibility. Existing tattoos can be integrated into the dotwork section, gradually disappearing as the dots become denser and eventually transition into solid black. This allows you to preserve elements you want to keep while eliminating others.
These technical demands make blackout tattoos among the most technically difficult techniques to master within the tattooing world, and some artists even undergo blackout tattoos themselves to learn how to execute them properly. The combination of achieving uniform solid black coverage while creating smooth transitions with other techniques requires exceptional skill and experience.
The Step Everyone Skips: Actually Visualizing This Thing
Here’s a mistake I see constantly: people commit to blackout coverage without really visualizing what it’ll look like on their body. They see examples on other people, think “yeah, that’s cool,” and book the first session.
Then they’re three sessions in, looking at their half-finished blackout arm, and reality hits. This is permanent. This is dramatic. This changes how you look in every situation for the rest of your life.
I’m not saying don’t do it. I’m saying make sure you’ve actually sat with the visual before you start. And no, looking at photos of other people’s blackout work isn’t enough. You need to see it on YOUR body, or at least a body similar to yours.
Some shops will do digital mockups. Most won’t because it’s time-intensive and doesn’t showcase their artistic skills the way custom designs do. So you might need to take initiative here.
There are tools for this now. AI tattoo generators that can render blackout designs on body placements. Yeah, they’re not perfect, and yeah, the final tattoo will look different. But they’re useful for answering basic questions: Full sleeve or geometric windows? Shoulder cap or shoulder-to-chest extension? Seeing multiple options side-by-side helps clarify what you actually want versus what sounds cool in theory.
The goal isn’t to design your exact tattoo digitally. The goal is to confirm you can handle the visual impact of solid black coverage on your body before you commit to something you can’t undo.
Walk into your artist consultation with clear visual references. They’ll appreciate that you’ve done your homework, and you’ll have a more productive conversation about what’s actually achievable.
Finding the Right Artist: Specific Things to Look For
Don’t just look at their portfolio. Look at healed photos specifically. Fresh blackout always looks solid. Healed blackout reveals the artist’s actual skill level. If an artist can’t show you healed blackout work, that’s a red flag.
Ask how many blackout pieces they’ve completed. “A few” isn’t enough. You want someone who’s done dozens, minimum. This is specialized work.
Ask about their touch-up policy. Do they include one touch-up session in the original price? Do they charge hourly for additional touch-ups? Get this in writing.
Watch how they talk about blackout work. Are they excited about it? Do they ask questions about your goals? Or do they seem like they’re just doing it because you’re paying them? Enthusiasm matters.
Here’s what artists won’t always tell you: some of them hate doing blackout work. It’s physically demanding, it’s time-intensive, and it doesn’t showcase their artistic skills the way custom designs do. If your artist seems unenthusiastic about your blackout project, find someone else. You want an artist who’s excited about blackout work, not someone doing it reluctantly because you’re paying them.
Check their Instagram for blackout work that’s at least 6-12 months healed. If everything in their portfolio is fresh, they either just started doing blackout work or they’re not confident about how their work ages. Either way, proceed carefully.
Major cities have blackout specialists. Smaller cities might have one or two artists who’ve done it a few times. Rural areas? You’re probably traveling. This isn’t gatekeeping. It’s acknowledging that blackout work requires specific skills that not every talented artist has developed.
Artists know touch-ups are almost always necessary for blackout coverage, but some won’t mention it upfront because they don’t want to scare you off. Ask directly during consultation: “Should I expect touch-ups, and are they included in the price?” Honest artists will say yes to the first question and clarify pricing on the second.
Most artists include one touch-up session in the original price. After that, you’re usually looking at $100-200 per hour for additional refinement. Some artists offer package deals if you know you’ll need multiple touch-ups.
The Mistakes I See Repeatedly
After doing this long enough, you start seeing the same mistakes over and over:
Rushing into it after a breakup or major life event. Blackout coverage is permanent. Your feelings about the breakup aren’t. Wait at least six months after any major emotional event before making permanent decisions about your body. I’ve had people come back a year later wanting to laser remove their blackout coverage because they blacked out their ex’s name while they were still angry, then regretted the blackout more than the original tattoo.
Not researching the artist. Blackout looks simple. Just fill in an area with solid black, right? Wrong. Achieving uniform saturation without patchiness requires specific technical skills. Find artists who specialize in blackout work and can show you healed examples, not just fresh photos. Fresh blackout always looks good. Healed blackout reveals the artist’s actual skill level.
Underestimating the visual impact. Seeing blackout work on someone else and seeing it on your own body are completely different experiences. What looks badass on Instagram might feel overwhelming when it’s on your arm and you’re looking at it every day. Visualize it realistically before committing.
Skipping the consultation. Book a consultation before booking sessions. Talk through timeline, pricing, touch-up expectations, and whether blackout actually solves your problem better than other options. Good artists will be honest about whether blackout is the right choice for your situation.
Trying to save money. Blackout coverage is expensive because it’s time-intensive and requires skill. Cheap blackout work looks cheap: patchy, uneven, poorly executed. This isn’t the place to bargain hunt. Save up and do it right, or don’t do it at all.
What I Wish Someone Had Told Me (And What I’m Telling You)
The visual impact is more dramatic than you think. Even when you’ve prepared for it. Even when you’ve visualized it. Seeing that much solid black on your body takes adjustment. Give yourself grace during that adjustment period.
The process is longer and more expensive than initial quotes suggest. Budget 20-30% more than the original estimate for touch-ups and additional sessions. You’ll probably need them.
Your relationship with the tattoo will evolve. What feels bold and exciting at first might feel normal after six months. That’s not bad. It’s just how humans adapt to permanent changes. But it means the initial thrill fades, and you need to be okay with the tattoo on regular Tuesday mornings, not just when you’re feeling it.
Some people will have opinions. Strong ones. About your choices, your appearance, your judgment. This is true for any visible tattoo, but blackout work generates more reactions because it’s more dramatic. Develop a thick skin about other people’s commentary, or don’t get visible blackout work.
You can’t un-do this easily. Laser removal is possible but expensive, time-consuming, and often incomplete. White ink or color overlays are options but they’re adding more tattoo, not removing what’s there. Make sure you’re genuinely ready for this to be permanent before starting.
Full disclosure: I’ve made recommendations I later regretted. I’ve encouraged people to go bigger with coverage when smaller would’ve been smarter. I’ve underestimated how much certain placements would affect someone’s professional life. You learn this stuff by doing it, and sometimes the learning comes from mistakes. I’m better at this now than I was five years ago, and I’ll probably be better five years from now than I am today. That’s the nature of the work.
Nobody Tells You This
Nobody tells you that blackout coverage feels different than traditional tattoos when you touch it. The solid saturation creates a slightly different texture. Not bad, just different. Some people love it. Some people find it weird at first.
Nobody tells you that black tattoos fade to a slightly blue-gray tone over decades. Not dramatically, but noticeably. This is normal ink aging, not a sign of poor work.
Nobody tells you that some jobs will never be okay with visible blackout work, no matter how accepting society gets. Federal law enforcement, some medical positions, certain legal roles. Know your industry’s actual policies, not what you hope they might be.
Nobody tells you that blackout work can affect how you regulate temperature in that area. Heavily saturated skin sometimes feels warmer or cooler than surrounding skin. It’s subtle but noticeable, especially right after completion.
So What Now?
You’ve made it through 6,000+ words about blackout tattoos. You’re either more confused than when you started, or you’re pretty sure this is what you want.
If you’re still on the fence, that’s fine. Blackout isn’t going anywhere. Your bad tattoo will still be there in six months when you’ve had time to think. Take that time. Look at more examples. Find artists whose blackout work you trust. Visualize it on your body. Sit with the idea of having that much solid black ink visible in your daily life.
If you’re certain, here’s what to do:
-
Find artists who specialize in blackout work specifically. Not just artists who CAN do blackout. Artists who DO it regularly and can show you healed examples.
-
Book a consultation before booking sessions. Talk through your coverage goals, timeline, budget, and maintenance expectations. Make sure you’re on the same page.
-
Plan for multiple sessions. Don’t try to rush it. Proper saturation takes time and patience.
-
Accept that touch-ups are part of the deal. Blackout coverage almost always needs refinement after healing.
-
Be realistic about visibility and professional impact. Some industries care, some don’t. Know which one you’re in.
Last thing: blackout tattoos aren’t for everyone, and that’s fine. If you read all this and thought “this sounds like too much commitment/pain/visibility for me,” that’s valuable information. Better to know now than three sessions in.
But if you read this and you’re more excited than intimidated, if the dramatic visual impact appeals to you, if you’ve got ink you’re ready to eliminate or a bold aesthetic you want to build, then blackout might be exactly what you’re looking for.
Just make sure you’re choosing it for the right reasons. Not because you’re panicking about old tattoos. Not because it’s trending. Not because someone else thinks you should. Choose it because it aligns with what you actually want from your body art, and because you’re ready for the commitment it requires.
Your skin. Your choice. Your timeline. Don’t let anyone rush you into it, including me.
One more thing, and then I’ll stop talking:
This is your body. Not your artist’s. Not your friends’. Not your family’s. Yours.
If blackout work feels right to you (if you’ve thought it through, visualized it, planned it, and you’re still excited about it), then do it. Don’t let anyone talk you out of something you genuinely want.
And if it doesn’t feel right, if something about this whole thing makes you hesitate, then don’t do it. There’s no shame in deciding this isn’t for you. Better to know that now than three sessions in.
Trust your gut. It’s usually smarter than you give it credit for.