
Tattoo Aftercare Starts Before the Needle Ever Touches Your Skin
I watched my first tattoo turn into a blurry mess within three years. The artist gave me aftercare instructions, I followed them religiously, but nobody told me the damage was already done during the design consultation. Turns out the decisions that matter happen before the needle ever touches your skin, and most artists won’t tell you this because it complicates the sale.
Your tattoo might look healed after a month, but the skin underneath is still repairing itself for up to six months. That’s not me being dramatic, that’s actual dermal layer healing time according to Health.com. Which means every choice you make during the design phase matters way more than anyone admits. We’re talking about a six-month biological process that starts the moment you commit to a design.
Table of Contents
-
You’re Thinking About Aftercare Too Late
-
Your Design Choice Determines How You’ll Heal
-
The Pre-Appointment Prep Nobody Mentions
-
What’s Actually Happening Under Your Skin
-
The First 72 Hours Make or Break Everything
-
Weeks Two Through Four Is When You’ll Fuck It Up
-
Color vs Black and Gray Require Different Care
-
Where You Put It Matters More Than You Think
-
Half the Products Your Artist Sells You Are Overpriced
-
Real Problems vs Normal Healing Weirdness
-
Your Daily Habits Are Sabotaging Your Ink
-
Making It Last Decades
TL;DR
Start thinking about aftercare during design, not after your appointment. The first 72 hours set the foundation for how your tattoo looks in 20 years. Most damage happens during weeks two through four when you think you’re healed but you’re not. Sunscreen forever or your tattoo will look like ass by 40.
You’re Thinking About Aftercare Too Late
Walk into any tattoo consultation and mention aftercare. Most artists will tell you they’ll give you instructions when you’re done. That’s the problem right there.
Look, I get it. You’re excited about the design, you’re thinking about placement, you’re imagining how badass it’s gonna look. But here’s the thing: every choice you make during the design phase creates different healing demands. The line weight you choose, the color saturation you want, the placement you select, these decisions determine whether you’re looking at a two-week healing process or a month-long journey with specific care requirements.
Only seven states actually require tattoo artists to provide aftercare instructions from the public health department (Alabama, Arkansas, Delaware, Louisiana, Massachusetts, Michigan, and North Dakota). Seven. Out of fifty. The majority of tattoo clients are relying entirely on individual artist practices that vary wildly in quality.
You need to understand how to take care of a tattoo before you commit to a design. You need to know what you’re signing up for.

The Design-to-Healing Connection You’ve Been Ignoring
Different design elements create different trauma levels in your skin. A delicate single-needle piece and a heavily saturated traditional design don’t just look different, they heal differently and require completely different care protocols.
Line weight matters. Thin, single-needle lines create precise trauma along defined paths. Bold, thick lines require multiple passes and create more inflammation. Color saturation matters. Packing vibrant colors into your skin requires the artist to work an area repeatedly, building up stress that extends healing time. Shading density matters. Soft gradients involve different techniques than solid black fills.
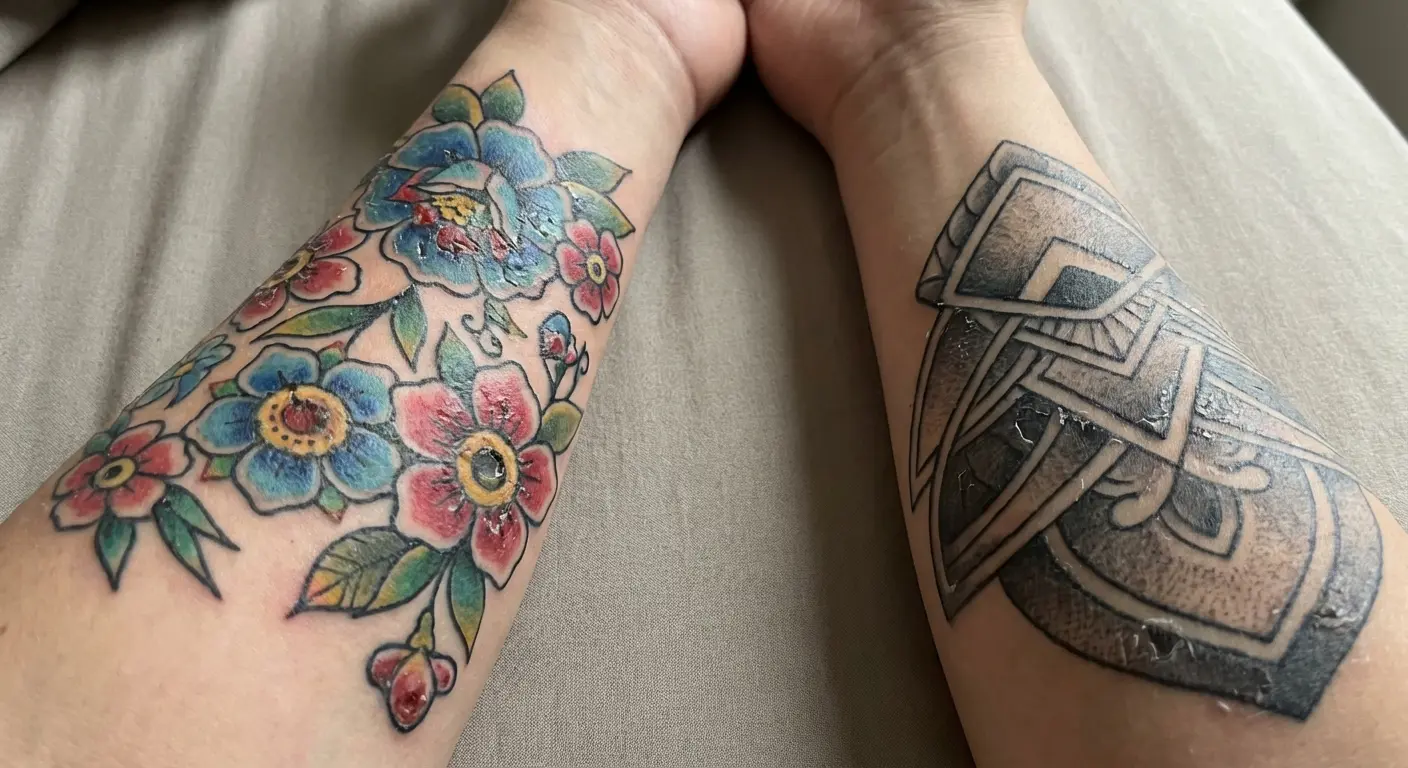
My friend Sarah got a delicate constellation on her wrist, thin lines, minimal shading, done in 45 minutes. She had mild redness for three days and was back to normal within a week. I got a full-color traditional rose on my forearm with heavy saturation, bold outlines, and detailed shading that took three hours. I dealt with significant swelling, prolonged oozing, and needed two full weeks before the inflammation subsided enough to wear long sleeves comfortably.
Same day, same studio, dramatically different healing journeys. All determined by design choices made during the consultation phase.
Questions You Should Ask Before Booking
Your consultation isn’t just about finalizing the design. It’s about understanding the healing implications of every choice you’re making.
Here are the questions that reveal what your aftercare routine will look like:
“Based on this design’s complexity, how long is this gonna take to heal?”
“Is this spot gonna be a pain in the ass because of friction or movement?”
“How does your technique affect healing compared to other methods?”
“Should we split this into multiple sessions or power through?”
“Can we modify anything to improve healing without compromising the vision?”
“What percentage of your clients with similar work need touch-ups?”
“What’s the most common way people screw up aftercare with this type of tattoo?”
“Can I see healed versions of similar work?”
These questions demonstrate that you understand aftercare extends beyond following basic instructions. The answers you receive should inform your decisions. If an artist tells you a particular design will require four weeks of intensive care and you have a beach vacation planned in three weeks, you need to adjust your timeline or modify your design.
Your Design Choice Determines How You’ll Heal
The relationship between design characteristics and healing requirements isn’t arbitrary. Different artistic choices create varying levels of skin trauma, inflammation, and recovery timelines.
You’re not just choosing what looks good. You’re choosing a specific healing journey.
Line Work vs Shading vs Color Packing
Line work creates precise trauma along defined paths. The needle follows a route, depositing ink in a controlled manner. Healing is usually straightforward, though raised lines can form scabs that need careful management.
Shading involves repeated passes over the same area. The artist builds up gradients and depth through multiple passes. More inflammation than simple line work because your skin experiences multiple trauma events in the same location. The healing timeline extends, and you’ll notice more swelling and sensitivity.
Color packing requires saturation. The artist needs to deposit enough pigment to achieve vibrant, lasting color. Working an area intensively causes significant fluid buildup and inflammation. Color tattoos often ooze more during the first few days and take longer to reach the peeling stage.
Many tattoos combine all three techniques, which complicates the healing timeline. Your outline might heal quickly while the heavily shaded background is still inflamed. The color sections might still be oozing while the line work is already starting to peel.
|
Tattoo Technique |
Trauma Level |
Typical Healing Time |
Primary Aftercare Focus |
Common Complications |
|---|---|---|---|---|
|
Line Work |
Low to Moderate |
1-2 weeks surface healing |
Preventing scab formation on raised lines |
Lines spreading if picked during healing |
|
Shading |
Moderate |
2-3 weeks surface healing |
Managing inflammation from repeated passes |
Uneven healing creating patchy appearance |
|
Color Packing |
High |
3-4 weeks surface healing |
Controlling fluid buildup and extended inflammation |
Color loss from excessive moisture or picking |
|
Combination |
High |
3-4 weeks surface healing |
Staged approach addressing each technique’s needs |
Different healing rates across the same piece |
Size and Session Length Matter
Larger pieces or longer sessions create more extensive inflammation. A six-hour session requires different care than a one-hour session, even if you’re following the same basic protocol.
Extended sessions create systemic inflammation, not just localized trauma. Your body is responding to hours of continuous stress. You might feel fatigued, slightly feverish, or generally unwell after a long session. Your immune system is mobilizing resources to address the trauma.
Sometimes splitting a large design into multiple sessions produces better healing outcomes than powering through in one marathon sitting. Your skin can only handle so much trauma before healing quality starts to decline. Fresh, well-rested skin accepts ink better and heals more predictably than exhausted, over-worked skin.
The Pre-Appointment Prep Nobody Mentions
The preparation phase sets you up for optimal healing. Most aftercare advice jumps straight to post-session care and completely skips this part.
Skin conditioning in the weeks before your appointment, lifestyle adjustments that improve your body’s healing capacity, logistical preparations that make aftercare easier. These proactive steps reduce complications and improve outcomes.
Skin Conditioning and Hydration
Well-conditioned skin accepts ink more readily, experiences less trauma during the session, and heals more predictably. You want to arrive at your appointment with skin that’s hydrated, healthy, and ready to handle what’s coming.
Start preparing two to four weeks before your appointment.
Look, I know you’re not doing a 4-week skin prep routine. Most people book their appointment and show up hungover. But if you can manage even a week of this stuff, you’ll heal better.
Four weeks out, start daily moisturization of the area to be tattooed. Use fragrance-free lotion. Increase water intake to 8-10 glasses daily. Stop using tanning beds and minimize sun exposure. Address any existing skin conditions like eczema flare-ups or excessive dryness.
Two weeks out, continue intensive moisturization twice daily. Avoid any exfoliating treatments or harsh scrubs on the tattoo area. No new skincare products that might cause reactions.
Week of appointment, light exfoliation 3-4 days before (not day-of). No alcohol-based products on the area. Final moisturization the night before. Arrive with clean, product-free skin on appointment day.
Hydration matters both topically and systemically. Drinking adequate water improves skin elasticity and healing capacity. Your skin is an organ, and well-hydrated organs function better. Topical moisturization maintains your skin barrier function, which protects against infection and supports efficient healing.
Sun damage compromises healing. Sunburned or tanned skin doesn’t accept ink as well and experiences more trauma during tattooing. If you’re planning a tattoo, protect that area from UV exposure in the weeks leading up to your appointment.
Your Body’s Healing Capacity
Sleep quality, nutrition, stress levels, immune function, and existing health conditions all affect your body’s ability to heal efficiently. You can optimize these factors in the weeks leading up to your appointment.
Sleep deprivation impairs immune function and slows tissue repair. If you’re consistently getting five hours of sleep per night, your body won’t heal as efficiently as someone getting seven to eight hours. You don’t need to become a sleep expert, but getting adequate rest in the week before and after your appointment makes a measurable difference.
Nutrition provides the building blocks for tissue repair. Adequate protein supports collagen synthesis and skin regeneration. Vitamins C and E support immune function and reduce inflammation. Zinc aids wound healing. You don’t need to overhaul your entire diet, but being mindful of nutrition during the healing period helps.
Stress elevates cortisol, which suppresses immune function and slows healing. High-stress periods aren’t ideal times to get tattooed. If you’re in the middle of a major life crisis, consider postponing your appointment until things stabilize.
Existing health conditions matter. Diabetes affects wound healing. Autoimmune conditions alter immune response. Blood thinners increase bleeding during the session. Be honest with your artist about your health status so they can adjust their approach accordingly.
Sometimes postponing an appointment is the right choice. If you’re sick, severely stressed, or dealing with health issues that could compromise healing, rescheduling produces better outcomes than pushing through.
What’s Actually Happening Under Your Skin
Understanding the biological process of tattooing helps you make better aftercare decisions. You’re not following arbitrary rules. You’re supporting a biological process.
Tattooing is controlled trauma. The artist uses needles to create thousands of tiny punctures that deposit ink while triggering your body’s wound-healing response.
Why Your Tattoo Is Basically a Wound
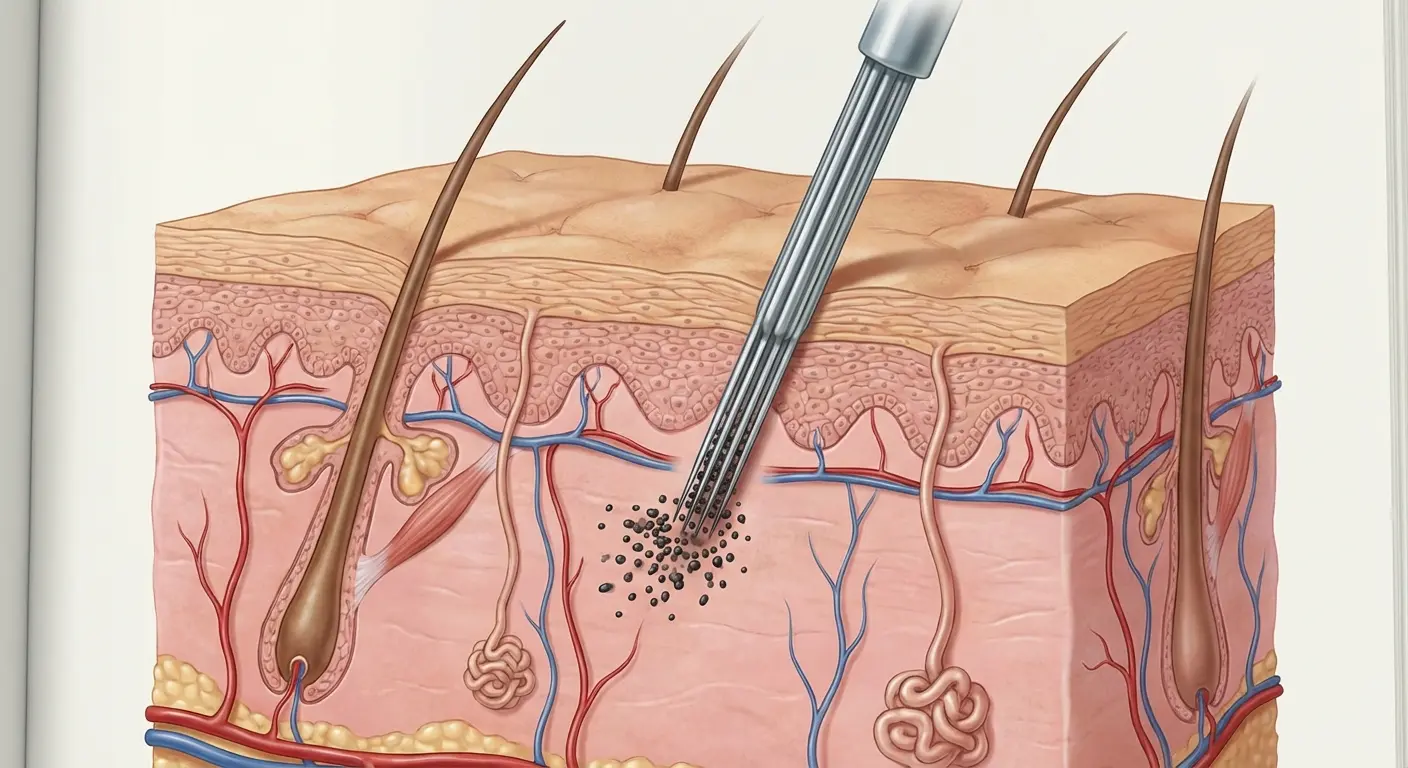
Tattoo needles penetrate your skin at a rate of 50 to 3,000 times per minute, depending on the machine and technique. Each puncture creates a tiny wound that deposits ink particles in the dermis, the layer of skin below the epidermis.
Your body immediately recognizes this as trauma and initiates its wound-healing response. Blood vessels dilate, increasing blood flow to the area. This causes the redness and warmth you feel immediately after getting tattooed. Plasma and white blood cells rush to the site, creating the fluid buildup and swelling you’ll notice in the first 24 hours.
Your body is trying to heal what it perceives as an injury. The inflammatory response is normal and necessary. It’s how your body protects against infection and begins the repair process.
Scab formation is your body’s way of protecting the wound while new skin forms underneath. The scabs contain ink, plasma, and dead skin cells. Pick at your scabs, lose your ink. It’s that simple. Those crusty bits are literally holding color in place while new skin forms underneath.
The Immune System’s Role in Ink Retention
Your immune system responds to tattoo ink as a foreign substance. White blood cells called macrophages attempt to remove the ink particles, which is why tattoos fade over time. Some ink gets carried away by your lymphatic system. Some gets broken down by macrophages.
But most of the ink particles are too large for macrophages to remove efficiently. These particles become trapped in the dermis, surrounded by fibroblasts that form a protective capsule around them. This encapsulation is what makes tattoos permanent.
Aftercare practices during the healing window affect long-term retention. Excessive sun exposure during healing can break down ink particles before they’re properly encapsulated. Picking at scabs removes ink before your body has secured it in place. Infection triggers an aggressive immune response that can push out more ink than normal.
Proper care
during the first month impacts how your tattoo looks in five or ten years. You’re giving your immune system time to properly encapsulate the ink particles instead of removing them.
The First 72 Hours Make or Break Everything
This period sets the foundation for everything that follows. Your skin is at its most vulnerable. The decisions you make during these three days determine whether you experience smooth healing or problematic complications.
The First 24 Hours Are Hell
Inflammation peaks during this period. Your skin is actively oozing plasma, ink, and blood. The area feels hot, looks angry, and might throb with your heartbeat. This is normal.
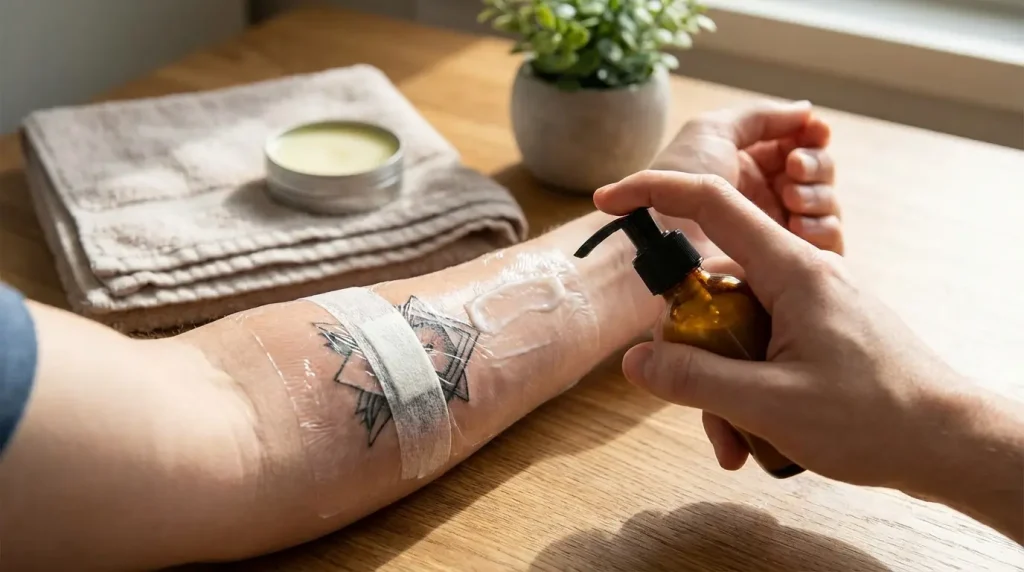
According to GQ Magazine’s tattoo aftercare guide, you should keep the initial wrap on for 8 to 12 hours, but if your artist used stick-on ‘second skin’ products like Tegaderm or Saniderm, you can keep it on for up to three to four days before beginning the rinse and repeat process.
Your first wash is crucial. Remove the bandage gently. If it’s stuck, wet it with warm water rather than ripping it off. Wash with lukewarm water and fragrance-free antibacterial soap. Use your hands, not a washcloth. Pat dry with a clean paper towel, not a fabric towel that might harbor bacteria.
You’ll see ink, plasma, and blood washing away. This is expected. You’re removing the surface debris so your skin can breathe and begin healing. Don’t panic when you see color going down the drain. The ink that matters is already in your dermis.
After washing, apply a thin layer of whatever product your artist recommended. Thin means you can barely see it. Your skin needs to breathe, not suffocate under a thick layer of ointment.
Yeah, it’s gonna hurt. Take some Tylenol. Don’t take ibuprofen right after because it thins your blood and you’ll ooze like a broken faucet. Ask me how I know. Elevation reduces swelling. If your tattoo is on your arm or leg, keep it elevated when possible during the first 24 hours.
Day Two and Three: Don’t Get Lazy Now
Initial pain subsides. The angry redness calms down. This is where people fuck it all up. Week three hits, it looks fine, and suddenly you’re back at the gym, swimming, doing everything your artist told you not to do.
You’re still in the critical healing phase. Your skin is forming the foundation for how this tattoo will heal over the next several weeks.
Wash your tattoo two to three times daily with the same gentle technique you used on day one. Apply a thin layer of moisturizer after each wash. Your skin should never feel tight or dry, but it also shouldn’t feel greasy or suffocated.
Moisture balance is tricky during this period. Too little moisture and you’ll develop thick, problematic scabs. Too much moisture and you’ll create a breeding ground for bacteria or cause maceration where the skin becomes overly soft and vulnerable.
How do you know you’ve got it right? Your tattoo should feel slightly moist to the touch but not wet. The skin shouldn’t look shiny or greasy. You shouldn’t see thick scabs forming. If you do, you’re not moisturizing enough.
Activities to avoid: swimming, soaking in baths, excessive sweating, tight clothing that rubs the tattoo, sleeping directly on the tattooed area. You can shower, but keep it brief and avoid direct water pressure on the tattoo.
This period sets up either smooth healing or problematic scabbing. Getting it right requires attention and consistency, even when you’re feeling better and want to return to normal life.
Weeks Two Through Four Is When You’ll Fuck It Up
The tattoo looks healed on the surface. The inflammation has subsided. You’re feeling confident. This is exactly when most people damage their ink.
Surface healing doesn’t equal complete healing. Remember that six-month timeline? You’re only a few weeks in. The skin underneath is still repairing itself, and the decisions you make during this period affect long-term appearance.
The Itching Phase Tests Everyone’s Willpower
Intense itching occurs during weeks two through three. Your skin is regenerating, and new skin cells are forming underneath the healing layer. This process triggers nerve endings that create an almost unbearable urge to scratch.
Scratching is the worst thing you can do. You’ll pull out ink, create scarring, and potentially introduce bacteria that leads to infection. But knowing you shouldn’t scratch doesn’t make the itching any less maddening.
A client with a large back piece described week two as “psychological warfare.” The itching was so intense at night that she found herself unconsciously scratching in her sleep, waking up to find flakes of healing skin under her fingernails and patchy areas in her tattoo. After consulting her artist, she started wearing a clean, soft cotton shirt to bed and keeping ice packs wrapped in thin fabric nearby. When the itching woke her, she’d apply the ice pack for 30-second intervals instead of scratching. She also kept her nails trimmed short and applied moisturizer before bed. These simple adjustments prevented further damage, though the areas she’d already scratched required touch-ups six months later.
Strategies that help: slapping the area gently instead of scratching, applying ice packs wrapped in clean fabric, increasing moisturizer application frequency, taking antihistamines if the itching is severe, wearing loose clothing that doesn’t irritate the area.
Distraction helps more than you’d think. When the urge to scratch hits, do something that occupies your hands. The itching comes in waves. If you can get through the peak without scratching, it will subside temporarily.
Peeling, Flaking, and the Urge to “Help It Along”
Your tattoo will peel during this phase. Large flakes of skin will lift at the edges, barely hanging on. The temptation to pull them off is overwhelming.
Don’t do it. Those flakes are attached to healing skin underneath. Pulling them off tears new skin and pulls out ink. You’ll create patchy areas that require touch-ups.
The natural exfoliation process happens on its own timeline. Your body knows what it’s doing. Interfering causes problems. The flakes will fall off when they’re ready. Your job is to keep the area moisturized so the peeling happens smoothly rather than creating thick, problematic scabs.
Normal peeling looks like thin flakes that lift at the edges, similar to a sunburn peel. The skin underneath looks slightly shiny and new. Colors might look dull or milky during this phase, this is normal and temporary.
Concerning peeling looks like thick, crusty scabs that crack and bleed. Large areas of skin coming off in sheets. Oozing or pus underneath the peeling skin. Increasing redness or swelling instead of decreasing.
If you’re seeing concerning signs, contact your artist. Most issues can be resolved with adjusted care, but some require medical attention.
When Can You Actually Return to Normal Activities?
Different activities pose different risks. The timeline for resuming each depends on your specific tattoo’s healing progress, not arbitrary rules.
Light cardio like walking or cycling: Wait 48-72 hours minimum. Sweat introduces bacteria to open wound. You’re ready when there’s no oozing and the bandage stays dry during light activity.
Swimming in pools: Wait 2-3 weeks. Chlorine damages healing skin, high bacteria risk. Resume when all scabs are completely gone and there’s no flaking skin.
Swimming in ocean or lakes: Wait 3-4 weeks. High bacterial load in natural water. Resume when your tattoo looks and feels like normal skin.
Heavy weightlifting: Wait 1-2 weeks depending on area. Stretching skin can cause ink loss and scab tearing. Resume when there’s no tightness moving through full range of motion.
Contact sports: Wait 3-4 weeks. Direct trauma can damage healing tattoo. Resume when there’s complete surface healing and no sensitivity to touch.
Sun exposure: Wait 4 weeks minimum. UV damage during healing causes permanent fading. Always use SPF 30+ after your artist confirms healing is complete.
Hot tubs and saunas: Wait 3-4 weeks. Heat increases inflammation, bacteria exposure. Same timeline as swimming pools, plus no residual tenderness.
These are minimum timelines. Your specific tattoo might need more time based on size, placement, and how your body heals.
Color vs Black and Gray Require Different Care
Different ink types require adjusted care approaches. Color tattoos typically involve more skin trauma due to the saturation required. Black and gray work often heals faster but has its own considerations.
Color Saturation and Extended Healing Times
Heavily saturated color work takes longer to heal. The artist needs to pack enough pigment to achieve vibrant, lasting color. Working an area intensively creates more inflammation and fluid buildup than you’d experience with black and gray work.
Color tattoos often experience more swelling during the first week. The oozing phase lasts longer. You might notice more discomfort and a longer period before you can comfortably wear normal clothing over the area.
Moisture balance becomes even more critical with color work. Too much moisture can cause color to leach out during healing. Too little moisture creates thick scabs that pull out color when they eventually fall off. You’re walking a tightrope between adequate hydration and excessive moisture.
The tattoo aftercare industry has evolved to address these needs. According to a recent Best Products review, specialized products have become increasingly sophisticated, with brands like Hustle Butter and Mad Rabbit developing formulations designed for the unique healing demands of heavily saturated color work versus traditional black and gray pieces.
Color work benefits from extended care even after surface healing appears complete. Continue moisturizing and protecting the area for at least six weeks, even if it looks healed after three. The deeper layers are still stabilizing, and this extended care improves long-term color retention.
UV Protection Is Non-Negotiable
Sun exposure is particularly damaging to color tattoos. UV radiation breaks down color pigments faster than black ink. Reds, yellows, and lighter colors are especially vulnerable.
During the healing period, sun exposure can cause serious problems. Your skin is already inflamed and vulnerable. Adding UV damage on top of that can lead to uneven healing, excessive scarring, and significant color loss.
After healing, sun protection becomes a permanent consideration. Every time your tattoo is exposed to UV radiation, the pigments break down slightly. This damage accumulates over years. A color tattoo that’s regularly exposed to sun without protection will look significantly faded within five years.
Physical barriers work best during healing. Cover your tattoo with clothing when you’re outside. After healing, high-SPF sunscreen becomes non-negotiable. Apply SPF 30 or higher every time the tattoo will be exposed to sun. Reapply every two hours if you’re spending extended time outdoors.
This isn’t optional if you want your color work to stay vibrant. Sun protection is the single most important factor in long-term color retention.
Where You Put It Matters More Than You Think
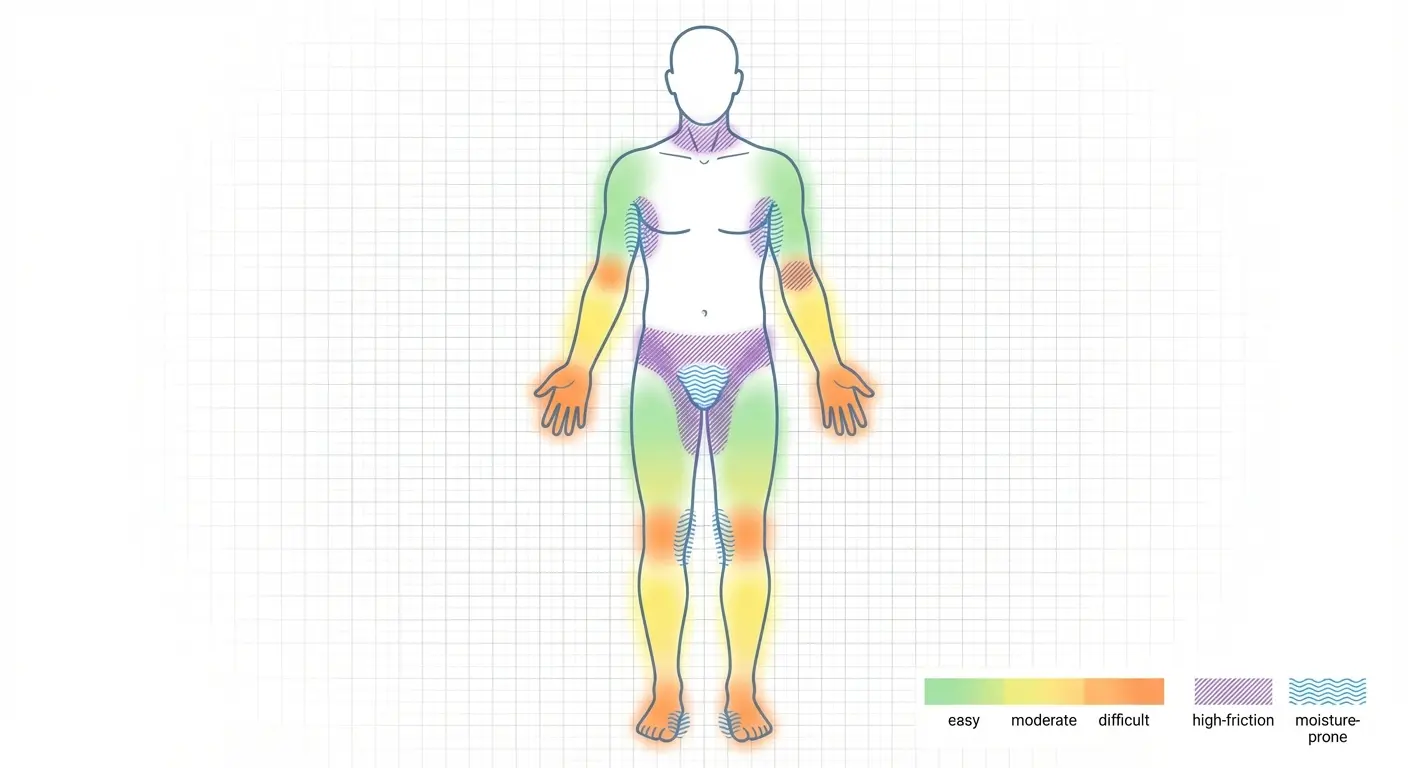
Different body areas heal at different rates and present unique challenges. High-friction areas, joints that bend and flex, areas prone to moisture accumulation, places that are difficult to keep clean, each presents specific considerations.
High-Movement Areas and Friction Management
Placements like inner arms, behind knees, fingers, and other areas that experience constant movement or friction require extra attention. Keeping bandages in place is challenging. Maintaining moisture without creating maceration is tricky. Protecting from clothing friction becomes a daily concern.
Clothing choices matter more than you might expect. Tight jeans rubbing against a fresh thigh tattoo will cause irritation and potentially pull out ink. A bra strap crossing a shoulder tattoo creates constant friction that impedes healing. Shoes rubbing against a foot tattoo can be excruciating.
Apply moisturizer right before you know you’ll be sitting still for a while, giving it time to absorb before the area experiences friction. Use protective barriers like non-stick pads under clothing when necessary.
Movement itself isn’t the enemy. Your body needs to move. But being mindful of how movement affects your healing tattoo helps you make adjustments that prevent complications.
Areas Prone to Moisture and Bacterial Exposure
Placements like feet, armpits, and other areas that accumulate moisture or have higher bacterial loads require more frequent cleaning. These locations are more vulnerable to infection, and careful moisture management prevents problems.
Feet are particularly challenging. They’re enclosed in shoes and socks for most of the day, creating a warm, moist environment that bacteria love. Healing a foot tattoo requires diligent cleaning, careful sock selection (clean, breathable materials), and potentially more time in sandals or barefoot than you’d prefer.
Signs of infection in these areas include increasing redness that spreads beyond the tattoo, warmth that intensifies rather than decreases, unusual discharge with an odor, and pain that worsens after the first few days. If you notice these symptoms, contact your artist or seek medical attention promptly.
Clean the area more frequently than you would a tattoo in a less challenging location. Change clothing that touches the tattoo daily. Keep the area as dry as possible between cleanings. Monitor closely for any signs that healing isn’t progressing normally.
Half the Products Your Artist Sells You Are Overpriced
The aftercare product landscape is confusing. Your artist recommends specific products. Online forums swear by different ones. Your friend used something completely different and their tattoo healed fine. How do you know what to use?
Product Categories and Their Functions
Petroleum-based ointments were the traditional recommendation for decades. Products like A&D ointment or Aquaphor create a protective barrier that keeps moisture in. They work, but they’re heavy and can clog pores if over-applied. They’re best for the first few days when your skin needs maximum protection.
Side note: the tattoo industry’s obsession with A&D ointment is weird. It’s diaper rash cream. We’re putting diaper rash cream on art. Anyway.
Specialized tattoo balms are formulated for healing tattoos. They typically contain ingredients that support skin repair while maintaining appropriate moisture levels. Brands have invested in research to create products that address the specific needs of healing tattoos. These work well throughout the healing process.
Fragrance-free lotions are the standard recommendation for the later healing stages. They provide moisture without the heavy barrier of ointments. They absorb more readily, which is what you want once the initial inflammation subsides. Basic, unscented lotions from brands like Cetaphil or Lubriderm work perfectly fine.
Newer products include foam-based aftercare and specialized healing serums. A January 2026 biotech breakthrough in tattoo aftercare demonstrated that advanced recovery technologies can accelerate healing by 40%. These innovations show promise, though traditional methods still work effectively.
Product choice should match your healing stage. Heavy ointments for the first few days, lighter products as healing progresses. Your tattoo’s characteristics matter too. Heavily saturated color work might benefit from specialized formulations, while simple line work heals fine with basic products.
When Less Is Actually More
Over-moisturizing is a common mistake. People think more product means better healing. This is wrong.
Too much product can impede healing. It traps bacteria against your skin. It prevents your tattoo from breathing. It can cause maceration where the skin becomes overly soft and vulnerable. You’re creating problems rather than preventing them.
Apply a thin layer after washing. You should barely be able to see the product on your skin. If your tattoo looks shiny or greasy, you’ve used too much. Wipe off the excess with a clean paper towel.
Frequency depends on how your skin feels. If it feels tight or dry, apply moisturizer. If it still feels moist from your last application, you don’t need more yet. Most people need to moisturize two to four times daily, but this varies based on skin type, climate, and tattoo characteristics.
Your skin knows how to heal. Your job is to support that process, not smother it.
Real Problems vs Normal Healing Weirdness
Certain healing phenomena worry people but are completely normal. Understanding these prevents panic while helping you monitor progress accurately.
Normal But Concerning
Scabbing that looks thick or crusty can be alarming, but light scabbing is expected. The scabs should be thin and shouldn’t crack or bleed. If they do, you need to increase moisturization.
Color intensity changes during healing are normal. Your tattoo will look incredibly vibrant immediately after your session, then appear dull or milky during the peeling phase. This is temporary. The true color emerges once healing is complete.
Raised areas where the ink sits can persist for weeks. This is particularly common with heavy saturation or areas that required multiple passes. The raised feeling should gradually decrease, not increase.
Slight swelling that comes and goes during the first two weeks is normal, especially if your tattoo is on an extremity. Elevation and ice packs help manage this.
Minor itching throughout the healing process is expected. It’s when the itching becomes intense during weeks two through three that it tests your willpower.
Ink appearing to fade during healing doesn’t mean you’re losing your tattoo. The healing skin layer obscures the true appearance. Once that layer sloughs off, your tattoo’s actual appearance becomes visible.
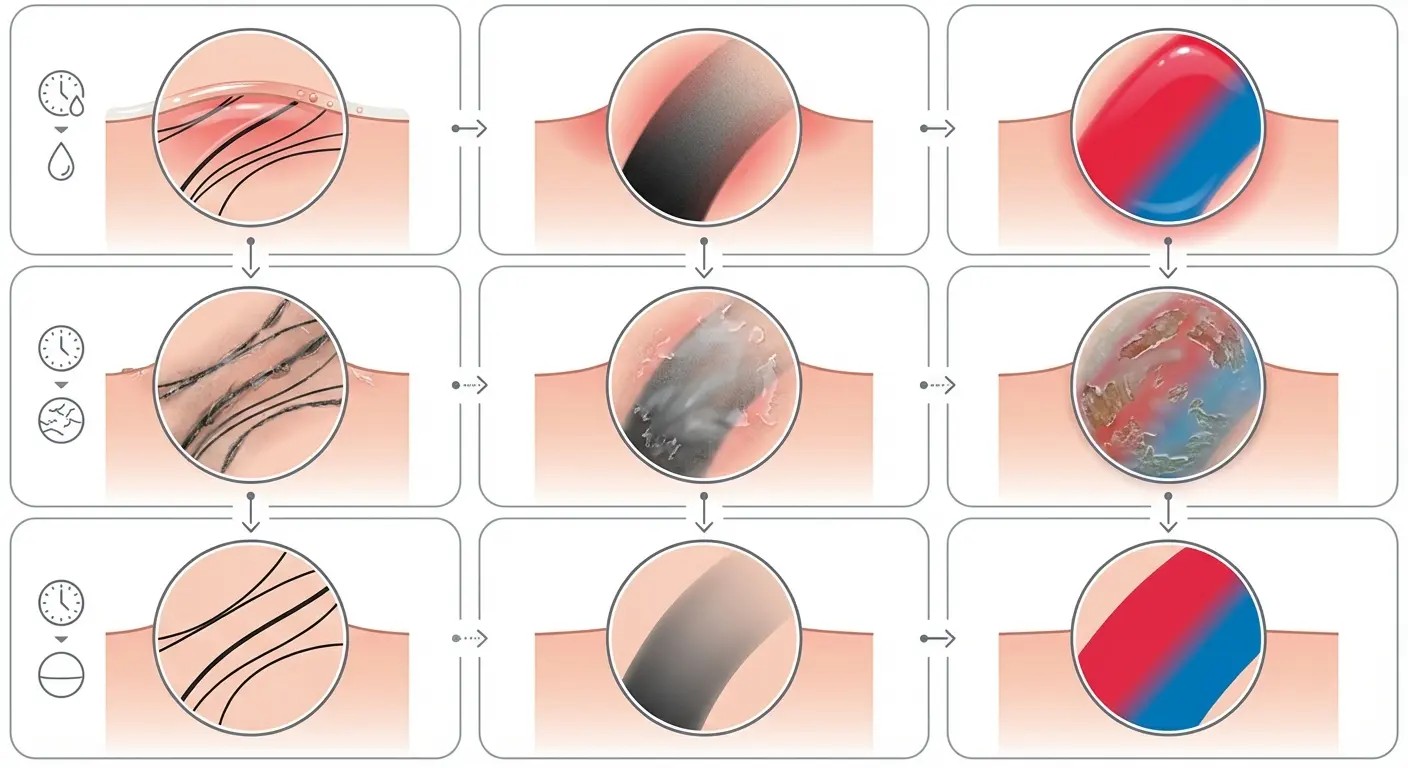
According to the American Tattoo Society, the healing process typically progresses through three distinct stages: the initial wound stage where the area feels similar to a sunburn and may appear red and slightly raised, the itching stage when well-formed scabs begin to flake off over about a week, and the final healing stage where dead skin obscures the tattoo’s true appearance until it naturally sloughs away.
Actual Warning Signs That Need Professional Attention
Fever developing after your tattoo session suggests infection. Your body is fighting something, and you need medical attention. Don’t wait to see if it resolves on its own.
Spreading redness that extends beyond the tattooed area indicates infection spreading. The redness should decrease over the first few days, not increase. If you see red streaks extending from your tattoo, seek medical care immediately.
Unusual discharge with an odor is a clear infection sign. Some oozing during the first few days is normal, but it should be clear plasma mixed with a bit of ink. Yellow, green, or foul-smelling discharge requires medical attention.
Severe pain that worsens rather than improves after the first few days isn’t normal. Pain should steadily decrease. If it’s intensifying, something is wrong.
Excessive swelling that doesn’t respond to elevation and ice, particularly if it’s spreading beyond the tattooed area, needs evaluation. Some swelling is expected, but it should be manageable and decreasing.
Allergic reactions to ink are rare but serious. Symptoms include intense itching that doesn’t respond to antihistamines, raised bumps or hives around the tattoo, and swelling that seems disproportionate to the trauma. Red ink causes allergic reactions more frequently than other colors.
Contact your artist first for concerns about healing progression, questions about whether what you’re experiencing is normal, or issues that seem related to the tattooing process itself. Seek medical care for signs of infection, allergic reactions, or symptoms that suggest systemic problems like fever.
Your Daily Habits Are Sabotaging Your Ink
Daily habits affect healing and long-term tattoo appearance more than most people realize. Sleep, diet, stress, exercise, alcohol consumption, these factors either support or undermine your tattoo’s healing and longevity.
Sleep, Stress, and Your Skin’s Repair
Sleep quality directly impacts healing speed and quality. Your body does most of its repair work while you sleep. Tissue regeneration, immune function, inflammation management, these processes peak during deep sleep.
Consistently getting five hours of sleep per night means your body won’t heal as efficiently as it would with seven to eight hours. You don’t need to become obsessive about sleep, but prioritizing rest during the healing period makes a measurable difference.
Stress levels affect healing through cortisol elevation. High cortisol suppresses immune function and slows tissue repair. If you’re in an intensely stressful period, your tattoo will take longer to heal and you’ll be more vulnerable to complications.
Prioritize sleep for at least the first two weeks after getting tattooed. Go to bed earlier if necessary. Create conditions that support quality sleep, dark room, comfortable temperature, minimal disruptions.
Stress management doesn’t require meditation retreats or complete life overhauls. Simple practices help. Taking breaks during the day, spending time outdoors, maintaining social connections, engaging in activities you enjoy. Anything that reduces your baseline stress level supports healing.
Diet, Hydration, and Inflammation Management
Nutritional choices affect healing outcomes. Adequate protein supports tissue repair. Your body needs amino acids to build new skin cells. Aim for protein at each meal during the healing period.
Hydration affects skin elasticity and healing speed. Dehydrated skin heals more slowly and is more prone to complications. Drink water consistently throughout the day. If you’re waiting until you feel thirsty, you’re already behind.
Anti-inflammatory foods can reduce swelling and discomfort. Foods rich in omega-3 fatty acids, antioxidants, and vitamins C and E support healing. You don’t need a perfect diet, but being mindful of nutrition during the healing period helps.
Excessive alcohol slows healing and increases inflammation. Alcohol dehydrates you, impairs immune function, and can thin your blood. Heavy drinking during the healing period is asking for problems.
High-sodium diets increase water retention and swelling. If your tattoo is already swollen, loading up on salty foods makes it worse.
Specific nutrients that support skin repair: Vitamin C for collagen synthesis, Vitamin E for skin protection and repair, Zinc for wound healing, Protein for tissue regeneration, Omega-3 fatty acids for inflammation management.
Exercise and Physical Activity
Resuming physical activity without compromising healing requires understanding which activities pose which risks. Excessive sweating introduces bacteria. Friction from workout clothing damages healing tattoos. Stretching certain placements can cause ink loss.
Light movement benefits circulation and overall healing. Complete inactivity isn’t necessary or beneficial. Walking, gentle stretching, and activities that don’t directly impact the tattooed area are fine after the first few days.
Different types of exercise have unique considerations. Weightlifting that involves the tattooed area should wait until surface healing is complete. Running causes sweating but doesn’t directly stress most tattoo placements, manage the sweat issue and you’re fine. Yoga involves stretching that might affect certain placements. Swimming requires complete healing due to bacteria exposure.
The Gym Environment Is Working Against You
Gym environments pose particular risks during healing. Shared equipment is covered in bacteria. Sweat accumulates in places you can’t immediately clean. Tight athletic wear creates friction. Chlorinated pools damage healing skin.
If you absolutely must maintain your training schedule, protective measures help. Cover your healing tattoo with a breathable, non-stick bandage during workouts. Clean the area immediately after exercising. Modify workouts to avoid directly stressing the tattooed area.
A competitive powerlifter got a full sleeve tattoo three months before a major competition. Despite warnings from his artist, he returned to heavy training after just five days, convinced that wrapping his arm in plastic wrap under his compression sleeve would protect the fresh ink. He tried to convince himself the yellow pus was just plasma.
Within a week, he developed a bacterial infection from the trapped sweat and bacteria, requiring oral antibiotics that made him nauseous and weak. The infection created scarring that pulled ink from several areas of his tattoo. He missed his competition entirely, spent $800 on medical care and eventual touch-ups.
His revised approach for his second sleeve: taking two full weeks off from upper body work, then gradually reintroducing exercises while monitoring the tattoo’s response. He scheduled the tattoo during his off-season, giving himself adequate recovery time without competition pressure.
Making It Last Decades
Your tattoo will be with you for decades. How it looks in year twenty depends on the daily habits you maintain over years.
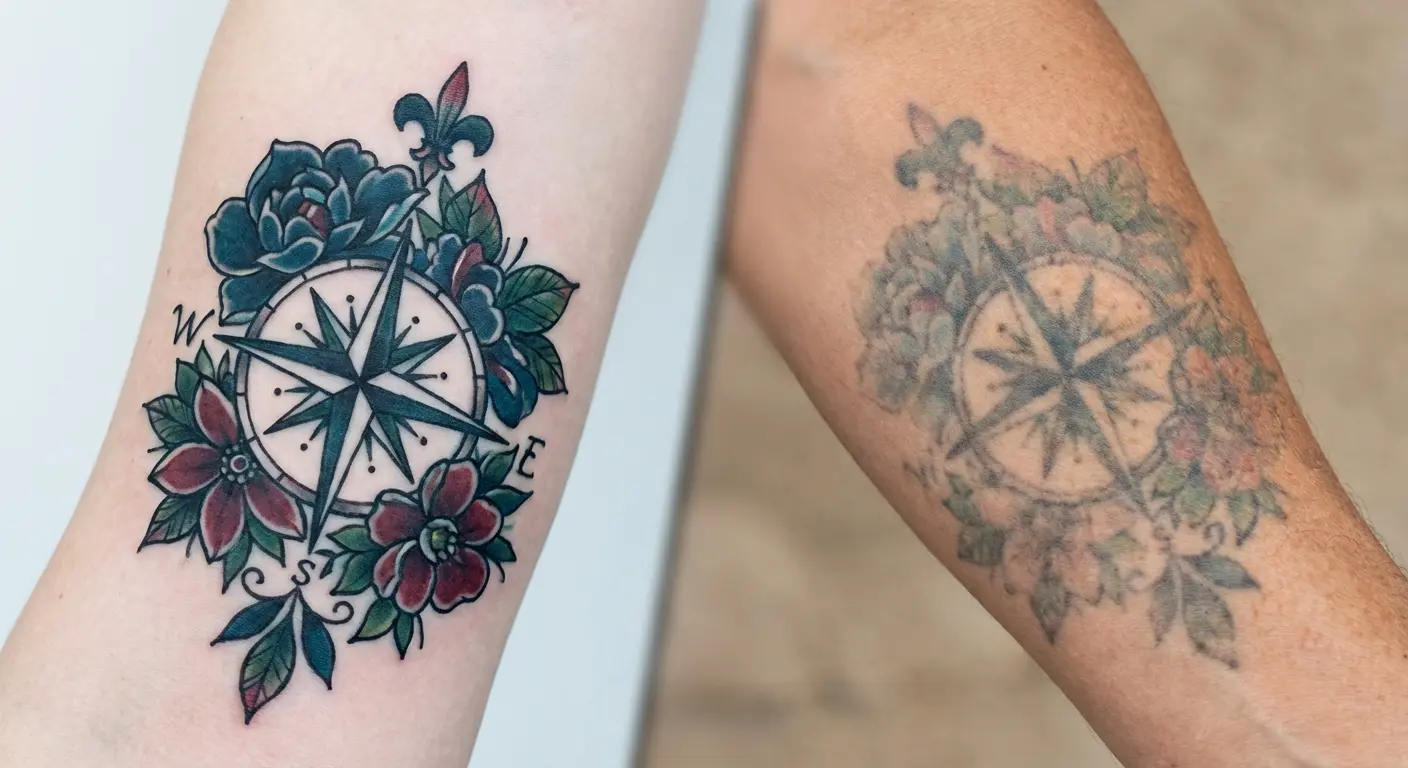
Sun Exposure Is Your Tattoo’s Biggest Enemy
UV radiation breaks down tattoo ink through a process called photodegradation. Each time your tattoo is exposed to sun, the UV rays break molecular bonds in the ink pigments. This damage accumulates over time.
Even incidental sun exposure adds up. Walking to your car, sitting near a window, brief outdoor activities, these moments of UV exposure accumulate over years. A tattoo that receives regular incidental sun exposure without protection will show significant fading within a decade.
Sun protection is the single most important factor in long-term tattoo preservation.
Apply broad-spectrum SPF 30 or higher to your tattoo whenever it will be exposed to sun. Keep sunscreen in your car, at your desk, in your bag. Make application automatic, not something you think about.
Clothing provides better protection than sunscreen. If you can cover your tattoo with clothing, do it. UPF-rated clothing offers even better protection.
Build sun protection into your routine rather than treating it as an extra step. Apply sunscreen to your tattoo when you apply it to your face. Choose clothing that covers your tattoos when practical. Seek shade during peak UV hours.
Moisturization and Skin Health as Ongoing Practice
Maintaining skin health keeps tattoos looking better longer. Well-hydrated, healthy skin displays ink more vibrantly than dry, damaged skin. The difference becomes more noticeable as years pass.
Apply lotion to your tattoo when you moisturize the rest of your body. This doesn’t require special products or elaborate routines. Basic, fragrance-free moisturizer works fine.
Aging affects tattooed skin the same way it affects all skin. Collagen production decreases, skin loses elasticity, and fine lines develop. These changes affect how your tattoo looks. You can’t stop aging, but maintaining skin health minimizes the impact.
Professional skin treatments require consideration. Chemical peels, laser treatments, and certain medications can affect tattoos. Retinoids, for example, increase cell turnover and can cause tattoos to fade faster. Consult with both your dermatologist and tattoo artist before starting treatments that might impact your ink.
Add tattoo care to what you’re already doing rather than building something separate.
When Touch-Ups Make Sense
Most tattoos benefit from touch-ups eventually. This isn’t evidence of poor initial work or inadequate care. It’s the reality of how ink behaves in skin over time.
Sun damage, natural aging, placement in high-friction areas, these factors cause fading and blurring that touch-ups address. Fine lines might spread slightly. Colors might lose vibrancy. Small areas might need reinforcement.
Compare current appearance to photos from when it was fresh. Look for areas where lines have spread or colors have faded significantly. Consider whether the changes bother you. Some aging gives tattoos character, and not everyone wants to maintain perfect crispness.
The touch-up process involves your artist going over areas that need reinforcement. It’s typically quicker and less intensive than the original session. Healing follows the same protocol as your initial tattoo.
Some placements require more frequent attention than others. Finger tattoos fade quickly due to constant friction and cell turnover. Foot tattoos experience similar challenges. Tattoos in areas with high sun exposure need more maintenance than covered areas.
Your tattoo isn’t failing if it needs a touch-up after ten years. You’re maintaining an investment, which is smart.
Weight Fluctuations and Skin Changes Over Time
Significant weight changes, pregnancy, aging, and other factors that alter skin affect tattoo appearance. Skin stretches, contracts, and changes texture. These changes impact how ink looks.
Placement matters for these considerations. Tattoos over areas prone to stretching, abdomen, breasts, upper arms, will be more affected by weight changes than tattoos on more stable areas like shoulders or calves.
If you get a large stomach tattoo and then gain or lose significant weight, the tattoo will change. The design might stretch or compress. Lines might shift. This doesn’t mean you shouldn’t get the tattoo, but understanding the possibility helps you make informed choices about placement.
Pregnancy causes significant skin changes, particularly on the abdomen. Tattoos in this area will stretch as your belly grows and may not return to their original appearance after delivery. Many people choose to wait until after having children to get abdominal tattoos, or they accept that changes are likely.
Bodies change over decades. Your tattoo will change with your body. Some changes add character and tell the story of your life. Others you might choose to address with touch-ups or cover-ups.
Before You Commit
Having a clear, well-developed design concept before your appointment leads to better sessions and better healing outcomes. When you and your artist are aligned on exactly what you want, sessions are more efficient, require fewer adjustments, and create less unnecessary trauma.
You’ve probably experienced the frustration of trying to describe a tattoo concept to an artist and watching them sketch something that’s close but not quite right. That back-and-forth process extends session time, creates unnecessary skin trauma from corrections, and often results in compromise designs that aren’t exactly what you envisioned.
When you’re unclear about what you want, you might end up with a more complex piece than necessary, which means longer healing times and more intensive aftercare requirements.
This clarity also helps you choose the right artist for your specific design. When you know exactly what you want, you can find an artist whose style and expertise match your vision rather than settling for someone who’s close enough. Better artist-design alignment means better execution, which typically translates to smoother healing because the work is done efficiently by someone skilled in that particular style.
Final Thoughts
Your tattoo’s design, placement, and your individual healing capacity all factor into what your aftercare should look like. Generic advice gets you partway there, but customizing your approach based on what you now understand about how tattoos heal gets you the rest of the way.
The decisions you make before your appointment matter just as much as what you do afterward. Skin preparation, design clarity, artist selection, and assessment of your lifestyle and healing capacity all contribute to outcomes.
Most tattoo damage doesn’t happen from dramatic failures. It happens from small, repeated choices made during those middle weeks when you think healing is mostly complete. It happens from years of forgetting sunscreen. It happens from not quite understanding why certain practices matter.
You now have that understanding. You know why certain steps matter. You understand the timeline from pre-appointment preparation through decades of maintenance.
Your tattoo will be with you for decades. The four weeks of intensive healing care and the ongoing maintenance practices that follow are investments in how that tattoo will look in year five, year ten, year twenty.
Take this seriously for a month, then protect it from the sun forever. Or don’t, and watch your $1000 tattoo turn into a blurry mess by the time you’re 45. Your call.